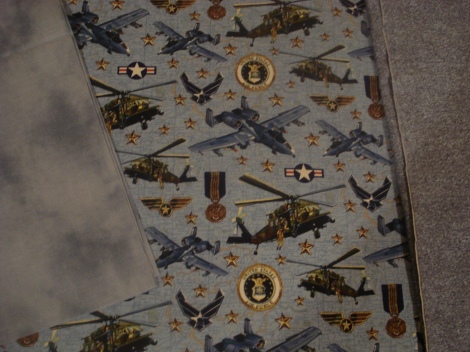
A friend is having a baby boy, and they actually like the Air Force. So picking out her baby quilt was pretty simple – I knew I wanted planes on it. Then I saw that Hobby Lobby actually carries an Air Force fabric. Woohoo! Makes my life easier – what could be better than planes made out of planes? (Other than having a husband who doesn’t point out that the father doesn’t fly the A-10, the featured plane on the fabric. Thanks, dear. Hush!)
A quick lap around Hobby Lobby’s fabric section yielded a smoky-blue cotton for the “sky” and another five to ten laps finally led to the discovery of some matching flannel in the clearance section, of all places. Baby boy flannel selections suck if you’re not looking for John Deere or frogs. The one I got is a really good match for the front side, so thank goodness for the clearance rack!
Now here’s where some quilt know-how would come in handy. I had NO CLUE how much fabric to buy. I’m doing nine blocks of 12″ squares. The “sky” needs five blocks on its own, then four triangles within the plane blocks. There’s only four plane blocks, but there’s a lot of pieces in each one, so leaving for seam allowances… I bought a yard of each and am hoping for the best. Besides, it’s Hobby Lobby – likely the same fabrics will be there forever if I need more! (Which is not true, as I learned on a later trip.)

(Interesting sidenote: the Air Force has a commemorative quilt, made in 1997 for the 50th anniversary. The 75th anniversary is the same year my husband is eligible for retirement. I wonder if they’ll do a quilt that year. I wonder if we’ll still be in the Air Force that year!)
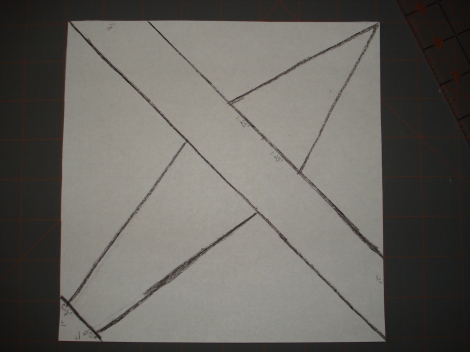
And the pattern. I’ve been surfing around for this one for, um, we’ve known it’s a boy since October? But I stumbled across this page a long time ago, maybe hunting for a plane block for the Wee One, who is obsessed with planes, trains and automobiles. And I always stared at the fourth block, which is the one used on the main quilt on that page. It’s so close to right, but… The plane isn’t a prop plane, at least not in MY head. So I printed out the pattern, enlarged it to 12×12, and straightened out the nose. Now that looks right! (And look, less cutting and sewing necessary!)

UPDATED: I finally got around to fixing this picture after I discovered that people were actually coming to the blog after Googling “airplane quilt.” It’d be nice to actually have a pattern, huh? This is 8×8 because, well, I don’t have 12×12 paper. Or, apparently, a scanner that’s connected to the computer, hence the picture of the pattern.
Basic pattern is this:
1) Draw a line right down the middle. That’s the bottom of the wing.
2) Mark 2″ above that line on the edge, both sides. Connect the dots. That’s the top of the wing. (For a 6×6 block, I’d go with 1″, for 12×12, 3″.)
3) Midway of the top wing is 4.25″. I marked at 5.5″ and 3″, then drew lines from the top right of the block to make the top of the airplane. If you want it wider, make it wider. If you want it skinnier, well, it’s already pretty tight at the top. Use your own judgment.
4) At the bottom left corner, mark 1″ off each side. Connect the dots. Shake your tail…
5) Mark the bottom of the wing at the exact place the plane “ends” at the top of the wing. I used the lines on my nifty quilting ruler to line it up perfectly. I never use them any other time, so this must be what they’re for.
6) Mark 1/4″ on each side of the top of the tail. Connect the dots from the wing to the tail. Make it skinnier if you want, but too much wider and you won’t really have much room to work!
Today I cut out that pattern and traced everything onto another paper bag with 1/4″ seams. The first one I actually measured 1/4″ out at several points and tried to line everything up….then I realized my cutting ruler has 1/4″ marked on it and all I had to do was follow the line. So much easier! (I told you I was making this up as I went along.) Zipped through the rest of the pieces and cut those out.
Cutting the fabric, so far, has been easy. I had a moment of panic when I thought I hadn’t left enough 12.5″ for the solid blocks, but remembered you CAN get three blocks out of 44″. All five solid skies are cut now, and two of the four plane skies. Tomorrow I’m cutting plane pieces and attempting to sew one together to see if I really planned this out right. I’m prepared to be wrong.
Oh, and baby’s due date? Mid-March. I have a months, tops.

so how’s it coming?