Wednesday 18 February 2009

Get your iPhone Apps off the ground

My day job is exactly that - it takes up all of my day! As Technical Director of a software company specialising in the hospitality sector, I am faced with keeping our current clients happy with their current requirements whilst magically embracing all the new emerging technologies, especially mobile applications.

During 2008, I dabbled with a number of solutions providing web-based applications designed for use on mobile technology such as a Blackberry Storm, Windows Mobile, iPhone or iPod Touch.

However, using Mobile Explorer on Windows Mobile or Mobile Safari on Apple devices felt like cheating, and once I looked into what you can do with Xcode (the development platform for Mac/iPhone), I was quickly convinced there is only one route to go. The Blackberry Storm and Windows Mobile devices are now sitting in my desk drawer gathering dust whilst the iPhone sits happily in its prominent new home - an iPhone 3G docking station from the Apple store.

Six weeks on, I'm an Apple Certified iPhone Developer and I thought a newbie in the world of iPhone development would appreciate a quick introduction into what's required to get up and running. So here goes.


First off, you need to ensure you have signed up for the Apple iPhone Developer Platform and have downloaded the free iPhone SDK:

iPhone Developer Site Resources

The iPhone Developer site has an abundance of useful information including some very useful 'Getting Started' videos. They are well worth a download and perfectly suited to viewing on your iPhone when you're not near your Mac.


What else do I need?

In three words: Beginning iPhone Development. Published by Apress and written by Dave Mark & Jeff LaMarche, it is simply the best £28 I've ever spent on a technical book.

There are a wealth of tools out there, but by simply installing the iPhone SDK, watching the Getting Started videos, reading this book from cover to cover and sitting with the book to complete the exercises resulted in an instant understanding of Objective-C and Cocoa Touch. I am seriously impressed. Buy it from Amazon today. Enough said.


Putting Your Apps on iTunes

Once you have built your first app and have successfully debugged it using the iPhone simulator, you will no doubt want to ship it out to the masses using the iTunes store. To do so, you must subscribe to the Apple Developer Program which costs £49 per annum via the iPhone Developer site.


And there you have it. The basics of starting out in iPhone development using Xcode, the iPhone SDK and the best technical book ever published!


Review and Buy on Amazon
Keywords
Apple Certified iPhone Developer
Beginning iPhone Development
iPhone SDK
Exploring the iPhone SDK
Apple Xcode
Getting Started with iPhone Apps
iPhone App Store

Thursday 12 February 2009

SEO Your Blogger Blog with Google Sitemaps

I was reading the other day that blogging is having it's tenth birthday this year. I've been involved in various web technologies since the mid-90s and fondly remember building my first animated gif, updating my code in Notepad and manually uploading it using a free FTP client.

When it comes to blogging, I am a complete newbie. As a newbie, I'm obviously working out things for the first time that a less experienced web-user but more experienced blogger would have cracked some time ago. However, I searched and searched for a guide that would help me add my blog to my Google Webmaster account. Adding the URL is easy enough, but I wanted to create an xml sitemap file and submit it, as I do for other websites I build and maintain.

After finding the solution in a Google white paper, I discovered it's extremely simple...


Before we begin, please ensure

Next, we need to create a new site in the Google Webmaster application
  • Access your Google Account.
  • Select Webmaster Tools from the main Google Account page.
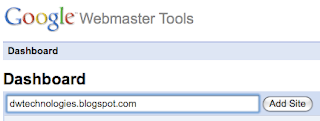
  • Under the dashboard title, enter the site URL and click 'Add Site'.


Next, we need to verify we are the owner of the new site
  • Go to the Webmaster Tools Dashboard
  • Alongside your new site, you will notice two links 'Add' and 'Verify' - click 'Verify'.
  • On the page that follows, select 'Add a meta tag' in the drop down menu and copy the text shown in the box.
  • Access Blogger in a new window and click the 'Layout' tab.
  • Click 'Edit HTML' in the navigation panel.
  • Paste the verification code underneath the [head] tag of your document and click 'Save'.
  • Close the Blogger window to return to the Dashboard - click the 'Verify' button.
  • Google will verify the site

Now we have verified our site, we need to submit our blog sitemap
  • Back to the Dashboard again and click 'Add' in the sitemap column
  • In the Add Sitemap box, enter 'atom.xml' and click 'Submit Sitemap'
  • Repeat the process for 'rss.xml'
  • Repeat the process for 'feeds/posts/default'
  • Repeat the process for 'feeds/posts/default?alt=rss'


Blogger blog optimised for Google using Webmaster Tools and Sitemaps - Done!


Keywords
Google Sitemap to Blogger
Add Google Sitemap to Website
SEO Blogger Sitemap
Blog Google Sitemap
Add Google Sitemap and Verify
Google Sitemap Webmaster Tools


Tuesday 10 February 2009

Encypting Important Files in Mac OS X (Tiger/Leopard)

I was sitting down with one of my developers today who recently dived into the world of Apple with his first MacBook Pro.

To my horror, when copying data over from his PC, I noticed a number of unsecure files with all sorts of important and sensitive data in, such as a reminder of his online banking passwords, ftp accounts etc. I was horrified.

So, the number one priority wasn't to show off the wonderful user experience of the dashboard or hitting F9 to show all currently opened applications, it was to set up a password protected, encrypted disk image to store important stuff in!


First off, we need to create a new disk image using the Apple Disk Utility
  • Open the Disk Utility (/Applications/Utilities/Disk Utility)

Next, we need to create the new disk image
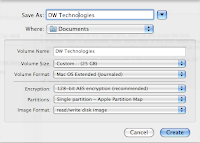
  • Select 'New Image'
  • In the Save As box, enter a filename for your disk image and select the folder location it should reside
  • Enter a Volume Name (the name of the disk once mounted)
  • Select the appropriate volume size (note that the size of the image cannot be raised at a later date so ensure you assign enough capacity)
  • Select 'Mac OS Extended (Journaled) for the Volume Format
  • For the encryption type, select 128-bit AES Encryption
  • Select 'Single Partition' in the Partitions menu
  • Select 'read/write disk image'
  • Click 'Create'

Finally, we need to password protect our new encrypted disk image

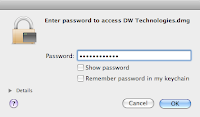
After a few moments, a dialog box will appear requesting a password to protect your disk image. I prefer not to add the password to my keychain to ensure that it needs to be entered every time I open the disk image. However, please ensure you can remember your password or the data will be lost forever should you forget it!


Once you have selected your password and keychain option, disk Utility will now create the new image (this may take a few minutes depending on the size of your disk image).


Open your new protected disk
Simply double click on the name of your disk image in the folder where you saved it in the step above, enter the password and the disk will mount on your desktop ready for use.


A password protected, encrypted disk image in Mac OS X Tiger/Leopard - Done!


Read Reviews and Buy on Amazon

Keywords

Password Protect Files
Encrypt Files
Encrypted Files
Mac OSX Disk Image
Password Protected Disk Image
Mac OSX File Encryption

Sunday 8 February 2009

Using your own email address with MobileMe and your iPhone/iPod Touch

As a follow up to my last blog 'Using your own email address with Mobile and Apple Mail', this blog focuses on how to set up your iPhone/iPod Touch with the same functionality.

When adding a MobileMe account to your device, it will do all the hard work once you've entered the basics. Unfortunately, it locks you out of any changes to mail configuration within the MobileMe settings.

All we need to do to overcome this is to turn off MobileMe mail and set up a new Mail-only account that talks to MobileMe for incoming mail and the server of your external email account for outgoing mail.


Firstly, let's set up your MobileMe account on the iPhone/iPod Touch
(If you have already done this, you can skip this section)
  1. Click the Settings icon on your device.
  2. Select Mail, Contacts, Calendars.
  3. Click Add Account and select MobileMe.
  4. Enter your Name, Address, Password, the description 'MobileMe' and click 'Save'.
  5. The device will configure the MobileMe account automatically.

Next, we need to deactivate MobileMe Mail
  1. Click the Settings icon on your device.
  2. Select Mail, Contacts, Calendars.
  3. Select the MobileMe account and set Mail to 'Off'.

Finally, we need to set up a separate MobileMe Mail Account
  1. Click Add Account and select 'Other'.
  2. Enter your Name, MobileMe email address, MobileMe password and the Description 'MobileMe Email' and click 'Save'.
  3. Your device will source your account information. Once it has, ensure the IMAP tab is selected.
  4. Change the Email Address to your external email address.
  5. For Incoming Mail Server, enter smtp.me.com as the hostname, your MobileMe account name for the user name and your MobileMe password.
  6. For Outgoing Mail Server, enter the outgoing SMTP server, username and password for your domain email account.
  7. Click Save.

Incoming email from your external email account

As explained in the prequel to this document relating to Apple Mail, you need to ensure that you are forwarding your incoming email from your external email account to your MobileMe email address to complete the process.


iPhone/iPod Touch with incoming MobileMe and external email account - Done!


Read Reviews and Buy on Amazon
Keywords
MobileMe Settings iPhone
MobileMe Settings iPod Touch
MobileMe Own Email Address
iPhone IMAP Settings
iPod Touch IMAP Settings
Change Email Address MobileMe
Different email address MobileMe


Thursday 5 February 2009

Using your own email address with MobileMe and Apple Mail

Despite hearing some concerns with synchronisation and reliability, I'm delighted with Apple's MobileMe. It's excellent value for money. I get the fundamentals on my iPhone that Hosted Exchange customers enjoy with their Blackberry at a fraction of the price. Synchronised Mail, Contacts and Calendars are seamless, and it's a doddle to configure unlike the woes of setting up Blackberry's Enterprise Server I experienced with my mobile provider.

I have both an iPhone with MobileMe and a Blackberry Storm with Hosted Exchange. The iPhone with MobileMe wins hands down (I must have a blog-like rant sooner or later about the Storm!).

The only disappointing thing about MobileMe was being forced to use dwtechnologies@me.com as my email address. I have a number of email accounts that I filter into my 'david.west@dwtechnologies.net' account and I want
ed all the functionality of MobileMe without 'dwtechnologies@me.com'!

Luckily, I found it pretty straightforward to configure for both Apple Mail and iPhone. This blog will concentrate on Apple Mail - keep an eye out for the iPhone version which I promise I will do as soon as I can...


Firstly, we need to ensure we've covered a few basics:
  • You have set up your MobileMe account (http://www.apple.com/mobileme)
  • MobileMe is configured on your Mac (System Preferences > MobileMe)
  • You have the appropriate SMTP settings to hand for the outgoing server relating to your external email account

OK, let's configure Apple Mail

1. Open Apple Mail, and select Mail > Preferences > Accounts.

2. Click the + symbol in the bottom left hand corner.

3. Enter your Full Name, Email Address, Pa
ssword and ensure 'Automatically set up account' is ticked > click Create.


4. Once the account has been created, select the MobileMe account in the left
hand column.


5. Change the Email Address to your external email address (you will see I have changed mine to 'david.west@dwtechnologies.net').


6. Next, select 'Edit Server List' from the Outgoing Mail Server (SMTP) menu.


7. Click the + symbol below the list of outgoing mail servers and edit the server name to the outgoing server for your external email account (you will see that the outgoing server for my external email account is mail.dwtechnologies.net).


8. Select the new outgoing server and enter a description.


9. Click the Advanced tab, and enter the relevant information for the outgoing server for your external email account. If you do not know this, please contact your mail administrator or service provider.


10. Click OK and you will be returned to Account Information. In the outgoing Mail Server (SMTP) menu, select the outgoing server for your external email account and tick 'Use only this server').


11. Close the Accounts window to complete the process.


Incoming Domain Email

Excellent. Apple Mail is now configured to receive mail from your MobileMe account and send via your external email account.

However, what happens to mail sent to your external email account?

Simple. All you need to do is forward the messages sent to your external email account on to your MobileMe email address. Although you could set up another Apple Mail account to send and receive your domain email, it's nice to have one account, one set of signatures, one set of mail rules etc.


Apple Mail with incoming MobileMe and external email account - Done!


Read Reviews and Buy MobileMe on Amazon


Keywords
MobileMe Own Email Address
MobileMe Apple Mail
IMAP MobileMe Settings
Change Email Address MobileMe
Different email address MobileMe
Apple Mail Settings MobileMe