Restore-SPSite Error

I deleted a site collection then I tried to restore a backup of it when I got the following error

“Restore-SPSite : The operation that you are attempting to perform cannot be com

pleted successfully. No content databases in the web application were availabl
e to store your site collection. The existing content databases may have reach
ed the maximum number of site collections, or be set to read-only, or be offlin
e, or may already contain a copy of this site collection. Create another conte
nt database for the Web application and then try the operation again.
At line:1 char:15
+ Restore-SPSite <<<< -Identity http://mol-moss-intra -Path “C:\Production Bui
ld 19-1-2012\MOLBackup\MOL.bak”
+ CategoryInfo : InvalidData: (Microsoft.Share…dletRestoreSite:
SPCmdletRestoreSite) [Restore-SPSite], InvalidOperationException
+ FullyQualifiedErrorId : Microsoft.SharePoint.PowerShell.SPCmdletRestoreS
ite”

In order to resolve the issue I had to do the following

  1. Open SharePoint Central Administration.
  2. Navigate to Application Management -> Manage Content Databases
  3. Select the Web Application
  4. Select Add a content database
  5. Specify the required information
  6. Re-run the Restore-SPSite command once more.

A dive into the SharePoint 2010 SP.UI.ModalDialog ECMAScript Class Library

I’m pretty interested in the ECMAScript class library of the SharePoint 2010, since, the documentation isn’t available on MSDN yet. I’ll try and explain the SP.UI.ModalDialog  methods.

Method Description Return Value
showModalDialog (options). The method will basically open a dialog with the a specified URL. The parameter SP.UI.DialogOptions though is very handy. It has some useful parameters. The URL of the page to be displayed in the dialog, the dialog title, the width and the height of the dialog. Also you can choose whether you want to show or hide the close and maximize buttons.
You can use the return object value to get the current URL,title, and the HTML of the dialog, Also you can check if the dialog was closed, and get the return value.
object of type SP.UI.ModalDialog
commonModal DialogClose (dialogResult, returnVal) The method is used within the dialog to close it. The method calls the DialogCallback method specified while opening the dialog and passes the 2 parameters to the callback method. The dialogResult which is an enumeration of type SP.UI.DialogResult with 3 values OK,Cancel, and Invalid. The other parameter is a return value of type object. void
OpenPopUpPage (URL, callback, width, height) Opens a dialog with the specified values but the difference is that you have less control over the dialog. void
ShowPopupDialog (url) Opens a dialog with the specified URL. It does the auto sizing for you. But you have no other control on the dialog. void
commonModal DialogOpen (url, options, callback, args) Opens the dialog with the URL and options passed parameters. Note that the values specified in the method call will override the values specified within the options void
showWaitScreenSize (title, message, callbackFunc, height, width) Opens a dialog and displays the default progress image of the SharePoint. When closed, the callback method is called. object of type SP.UI.ModalDialog
showWaitScreen WithNoClose (title, message, height, width) Opens a dialog and displays the default progress image of the SharePoint. The close button is hidden. object of type SP.UI.ModalDialog
RefreshPage (dialogResult) Refresh the page after closing the dialog. void

Example of using the SP.UI.DialogOptions:

var options = {
url: "AddCarPage.aspx",
title: "Custom Add Page",
showClose: false,
allowMaximize: false,
autoSize: true,
// width: 800,
// height: 600,
dialogReturnValueCallback: DialogCallback
};
dlg = SP.UI.ModalDialog.showModalDialog(options);

Using the Sharepoint 2010 Dialog

The new dialog framework is introduced in the SharePoint new Client OM. You can check the Client OM at http://msdn.microsoft.com/en-us/library/ee535231.aspx. For now, we’re interested in the method SP.UI.ModalDialog.showModalDialog.

How it works?

When the showModalDialog method is invoked the SharePoint adds a div element named “ms-dlgContent”. The dialog contents are rendered from the passed URL. The passed URL can be a link to the web or a custom page. Also, the dialog can open a List Form dialog (Add/Edit). Another div element named “ms-dlgOverlay” disables the user from clicking on the original page and thus, provides the user with a modal dialog.

The showModalDialog method takes 1 parameter; an object of the Class SP.UI.DialogOptions. The option object contains the width and height of the dialog, the URL of the page and the dialog CallBack method name.

Examples:

The Preparation

1. Create a new Layouts page.

2. Add 3 input buttons to the PlaceHolderMain of the ASPX page. The buttons should look something like this

<input type="button" value="Open Google in Popup" id="btnGoogle"  onclick="OpenWebPage();"/>
<input type="button" value="Open My Custom Page" id="btnMyPage"  onclick="OpenMyWebPage();"/>
<input type="button" id="btnAddItem" value="Add Item" onclick="NewItemDialog();" />

3. Add a CallBack method that will be called when the dialog closes, in order to notify the user with the result of the dialog. You can find more info about the SP.UI.Notify.addNotification here

function DialogCallback(dialogResult, returnValue) {
meesageId = SP.UI.Notify.addNotification(returnValue, false);
}

1. Open a link to the web

Set the URL of the options object to the web URL.

function OpenWebPage() {
var options= {
url:"http://www.google.com",
width: 800,
height: 600,
dialogReturnValueCallback: DialogCallback
};
SP.UI.ModalDialog.showModalDialog(options);
}

2. Open a Custom page

We’ll Use the AddCarPage that was created in the previous post. We’ll need to modify the 2 Callback methods of success and failure to the following

function Succeeded() {
SP.UI.ModalDialog.commonModalDialogClose(SP.UI.DialogResult.OK,'Item Created');
}
function Failed(sender,args) {
SP.UI.ModalDialog.commonModalDialogClose(SP.UI.DialogResult.cancel, 'Item Creation Failed');
}

Set the URL of the options object to the AddCarPage.aspx

function OpenMyWebPage() {
var options = {
url: "AddCarPage.aspx",
width: 800,
height: 600,
dialogReturnValueCallback: DialogCallback
};
SP.UI.ModalDialog.showModalDialog(options);
}

3. Open a New Item From

Set the URL of the options object to the NewForm.aspx of the list. Note that you can also use any of the form dialogs.

function NewItemDialog() {
var options = {
url: "http://shaalan:4040/sites/UserExperience/Lists/Cars/NewForm.aspx?RootFolder=",
width: 800,
height: 600,
dialogReturnValueCallback: DialogCallback
};
SP.UI.ModalDialog.showModalDialog(options);
}

Adding an Item to a SharePoint List using JavaScript

I found out that adding an item to a list using the Sharepoint client OM  in SharePoint 2010 is not as simple as it seems to be. There are plenty of examples on demos using the Sharepoint client OM in the code behind. But I couldn’t get my hands on how to do this using JavaScript. And the documentation on SP.js isn’t available yet. So how did i do it?

The Preparation

1. Create a custom list named Cars.

2. Create a new Empty SharePoint project.

3. Add a mapped Layouts folder

4. Add a page called AddCarPage.aspx

5. Create JavaScript method called AddCar.

6. Add an input of type button and set it’s onclick to AddCar(). another input of type text and name it as txtCar.

The PlaceHolderMain of the ASPX page should now look something like this :

<asp:Content ID="Main" ContentPlaceHolderID="PlaceHolderMain" runat="server">
<input type="text" id="txtCar" />
<input type="button" id="btnAddCar" onclick="AddCar();" value="Add Car" />
<label id ="lbl" runat="server"/>
</asp:Content>

The SharePoint

We need to include the SharePoint ECMAScript library in the aspx page.The main file is SP.js . Information about all the ECMAScript Library can be found here. Including the SP.js can be done using the SharePoint:ScriptLink tag.

<Sharepoint:ScriptLink name="SP.js" runat="server" OnDemand="true" localizable="false" />

We will write our code in the AddCar JavaScript method.

function AddCar() {
//Retrieve the txtCar and check if it has some text.
var txtCar = document.getElementById("txtCar");
if (txtCar.value == "") {
alert("please enter a car");
return;
}
//Retrieve the clientContext
var clientContext = SP.ClientContext.get_current();
//Retrieve the current website
var webSite = clientContext.get_web();
//Retrieve the lists
var lists = webSite.get_lists();
//Get the Cars List
var carsList = lists.getByTitle("Cars");
//Create new IteamCreationInformation
var itemCreationInfo = new SP.ListItemCreationInformation();
//the addItem takes the itemCreationInformation object
//and returns the listItem
var listItem = carsList.addItem(itemCreationInfo);
//Set the title of the list Item
//to the value in the txtCar
listItem.set_item("Title", txtCar.value);
//Call Update the listItem
listItem.update();
//Finally execute the operation
//pass to it a 2 callBack methods OnSucceed and OnFailure
clientContext.executeQueryAsync(
Function.createDelegate(this,this.Succeeded)
,Function.createDelegate(this,this.Failed));
}

Finally add the 2 CallBack method

function Succeeded() {
alert("Succeeded");
}
function Failed(sender,args) {
alert("fail");
}

Using the ASP.NET PageMethods

An easy way to start working with AJAX is using the PageMethods functionality. An example of using them is when a user is registering to your website and you want to check the availability of a user name against your data store and you want to spare yourself the hastle of creating a web service and calling it from the clientside code. I’ll explain how to create a PageMethod to satisfy this scenario.

What you need to do in the code behind file

1. Create a static method that checks the name
public static string CheckUserNameAvailable(string value)
{
if (value.Length < 8 )
throw new Exception( "User name length must be 8 or more");
if (value.ToLower() == "islam.shaalan")
return "0";
else
return "1";
throw new Exception("Please Specifiy a valid value");
}

2. Add an attribute [WebMethod] to the CheckUserNameAvailable static method.

In the HTML you’ll add a ScriptManager Tag to enable the usage of AJAX.

3. Add a script manager tag and set the EnablePageMethods to true.
<asp:ScriptManager ID="ScriptManager" runat="server"
EnablePageMethods="true" />

4. Create your interface
<label>UserName</label>
<input type="text" value="" id="userName"/>
<input type="button" value="Check Availability" onclick="CheckAvail();" />

Finally With The JavaScript

5. Create the CheckAvail() method that will call the CheckUserNameAvailable PageMethod and pass the value in the User Name text box.The method call can take 2 other optional parameters the onSuccess and onFailure. The onSuccess is called whenever the called method returns normally. If an uncaught exception is raised on the server the onFailure method is going to be called.
function CheckAvail() {
var userName = document.getElementById('userName');
PageMethods.CheckUserNameAvailable(userName.value, OnSucceed, OnFailure);
}
function OnSucceed(value) {
if (value == "0")
alert("UserName is already in use.");
else
alert("UserName is available.");
}
function OnFailure(error) {
alert(error.get_message());
}

Posting back an ASP.NET page from Javascript

A Postback is another name for HTTP POST. The contents of a form are sent to the server for processing some information. Afterward, the server sends a new page back to the browser.
In some scenarios you’d like to postback the page or part of the page if you’re using AJAX. All the ASP.NET server controls except the ImageButton and Button will call a JavaScript method called __doPostBack(eventTarget, eventArgument). This method is inserted to the page HTML output by the ASP.NET runtime engine. The method accepts 2 arguments

  • __EVENTTARGET: holds the ID of the control that’s raising the postback event
  • __EVENTARGUMENT: holds additional information that are required by the control on the server

//The __doPostBack method inserted by the ASP.Net runtime
function __doPostBack(eventTarget, eventArgument) {
if (!theForm.onsubmit || (theForm.onsubmit() != false)) {
theForm.__EVENTTARGET.value = eventTarget;
theForm.__EVENTARGUMENT.value = eventArgument;
theForm.submit();
}
}

In order to do a postback from JavaScript code all you need is call the __doPostBack method, but this isn’t the best and safest way to perform the action. If the ASP.NET guys changed the name of the method your code will break. To prevent this you’ll need to use some server side code.
Create a method called DoPostBackJS().
function DoPostBackJS() {
<%= Page.ClientScript.GetPostBackEventReference(this, "posting back from js") %>
}

The line of code in the preceding method at runtime will be evaluated to
__doPostBack('__Page','posting back from js')

Creating events on variables in Javascript

Handling an event on an array in Javascript is a common task. One of the most common scenarios is creating a custom control and triggering an event when a change happens in this control. I’ll explain a simpler scenario; when you are doing something behind the scenes and updating an array.Then, you’d want to notify the user with the added object.

The following steps are the main steps to create an event

First, we define an array with some values and an other array to hold the event handlers for the event that we need to trap.
var shapes = ["Rectangle", "Square", "Triangle"];
//an array to hold the name of methods registered as the event handlers
//for the onchange event.
var OnArrayChange = [];

Second, we create a method that adds the event handlers to the OnArrayChange array.
function RegisterOnArrayChangeEvent(methodName) {
OnArrayChange.push(methodName);
}

Third, we create a method that raises the event. The method will call each registered event handler and specify the updated of the shapes array.
function RaiseOnArrayChange(obj) {
//a loop through all registered event handlers and call them
for (var i = 0; i < OnArrayChange.length; i++) {
OnArrayChange[i](obj);
}
}

Fourth, we create a method that adds a new shape to the shapes array. Then, it raises the ArrayChange event.
function AddShape(shape) {
var len = shapes.push(shape);
//fire the change event
RaiseOnArrayChange(len);
}

The next step is used to wire an event handler with the event.

Fifth, we create the event handler for then ArrayChange event. The user will be alerted with the updated length.
function ArrayChangeEventHandler(length) {
alert(length);
}

Sixth,we register the event handler to the OnArrayChange event. and add the shape “Circle” to the array
function CreateShapes() {
//bind the event handler to the event
RegisterOnArrayChangeEvent(ArrayChangeEventHandler);
AddShape("Circle");
}

Finally, we call the CreateShapes method to begin the execution of the code.
CreateShapes();

Handling the JavaScript Array Object

Initializing an Array

There are 3 ways to initialize an array
1-
var shapes = new Array(); //Optional parameter array size
shapes[0]= "Square";
shapes[1]= "Rectangle";
shapes[2]= "Triangle";

2-
var shapes = new Array("Square","Rectangle","Triangle");
3-
var shapes = ["Square","Rectangle","Triangle"];
There is no performance impact in choosing any of these.(Whether you are using primitive or complex types)

The difference between the three ways is that; in the first way, the constructor can take a parameter with the length of the array, and the length right after initialization will be the value specified even if the array has no objects yet.

var shapes = new Array(2);
//the value of shapes.length is 2
shapes[0]= "Square";
shapes[1]= "Rectangle";
shapes[2]= "Triangle";
//The array will not raise an exception as expected
//it will just increase the length of the array
//the value of shapes.length becomes

Manipulating objects in array :

1- Push: Adds the value to the end of the array and returns the length of the array after adding the element
var letters = ["a", "b", "c"];
//array has a,b,c
letters.push("d");
//array now is a,b,c,d
letters.push("e","f");
//array now is a,b,c,d,e,f

2- Unshift: Adds the value to the beginning of the array. returns the length of the array after adding the element
var letters = ["a", "b", "c"];
//array has a,b,c
letters.unshift("d");
//array now is d,a,b,c
letters.unshift("e","f");
//array now is e,f,a,b,c,d

3- Pop: removes the last element of the array. returns the object removed.
var letters = ["a", "b", "c"];
//array has a,b,c
letters.pop();
//array now is a,b
//note that if u add any parameter to the pop method it will be ignored
//without giving any errors

4- Shift: removes the first element of the array. returns the object removed.
var letters = ["a", "b", "c"];
//array has a,b,c
letters.shift();
//array now is b,c
//note that if u add any parameter to the shift method it will be ignored
//without giving any errors

5- Splice:
takes parameters (StartIndex, DeleteCount, [Object1,…]) ; a very useful method that can do multiple things.

  • Adding object
  • Removing object(s)
  • Replacing object(s)

var letters = ["a", "b", "c"];
//array has a,b,c
letters.splice(letters.length,0,"d");
//element is added to the end of the array
//array value is a,b,c,d
letters.splice(0,0,"-1");
//element is added to the beginning of the array
//array value is -1,a,b,c,d
letters.splice(0,0,"-3","-2");
//as noticed the splice can accept multiple objects to be added
//elements are added to the beginning of the array
//array value is -3,-2,-1,a,b,c,d
letters.splice(10,0,"m");
//element is added to the beginning of the array
//array value is -1,a,b,c,d,m
//giving an out of range value will not raise errors
//it will just add the specified object to the end of the array
letters.splice(1,2);
//elements are removed from the middle of the array
//array value is -3,a,b,c,d,m
letters.splice(0,1);
//element is removed from the beginning of the array
//array value is a,b,c,d,m
letters.splice(3,2);
//element is removed from the end of the array
//array value is a,b,c
letters.splice(1,1,"x","y");
//The element "b" at position 1 is removed and
//replaced with "x","y"beginning of the array
//the array value is a,x,y,c
Sharepoint 2010 Configuration Wizard Error: System.ServiceProcess.TimeoutException: Time out has expired and the operation has not been completed.

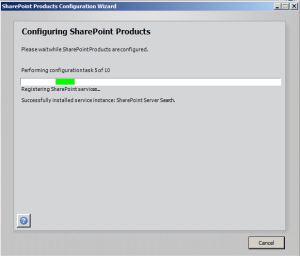
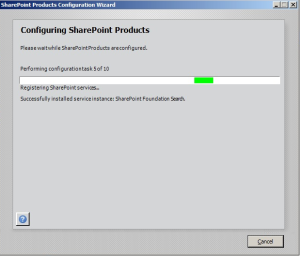
While creating a VPC, I installed Windows Server 2008 R2, Visual Studio 2010 RC  and then the Sharepoint 2010 RC.  I stumbled upon the following error while running the Sharepoint 2010 Configuration Wizard “Error: System.ServiceProcess.TimeoutException: Time out has expired and the operation has not been completed.” It occurred twice on Configuration task 5 of 10; the first time when the status was “Successfully installed service instance: Sharepoint Server Search.”


Sharepoint Server Search

Sharepoint Server Search

In order to fix this error, I opened the Services, changed the log on of the service named “Sharepoint Server Search V14” from local service to local system and started the service manually while the wizard was still running.

The second time when the status was “Successfully installed service instance: Sharepoint Foundation Search”.

Sharepoint Foundation Search

Sharepoint Foundation Search

This time I changed the log on of the service named “Sharepoint Foundation Search V4” from local service to local system and started the service manually.

Afterwards, the configuration wizard completed successfully.

Error: Installation failed for component Microsoft Visual Studio 2010 64bit Prerequisites

When trying to download Visual Studio 2010 RC, I ran the setup but the installer threw the following error

“VC 9.0 Runtime (x86) : [2] Error : Installation failed for component VC 9.o RUntime (x86). MSI returned error code 1603”

I removed all VC Components from the programs and features. Another error popped up

“Microsoft Visual Studio 2010 64bit Prerequisites (x64) : [2] Error: Installation failed for component Microsoft Visual Studio 2010 64bit Prerequisites (x64)”

After inspecting the error log i found the error in the .Net framework 4.0 machine.config i thought that error occurred because the installer did some action while installing the VC 9.0 Runtime and it was not rolled back in the machine.config . I removed all components installed by the Visual Studio 2010, started a clean installation and It worked just fine.