Create TermSet Programmatically using powershell in SharePoint 2010

Today in the blog, I thought I would cover the new Managed Metadata Services in more detail, because as far as I am concerned this is the most important new feature in SharePoint 2010. Managed Metadata Services will provide enterprise management of metadata terms and content types for SharePoint 2010.  This will allow organizations to share metadata taxonomies and terms across multiple SharePoint webs and site collections. 
In addition, Microsoft is finally allowing content types to be shared across webs and site collections using the same service.  This will provide a much more unified view of data across the organization.
 
Managed Metadata Service in SharePoint 2010
There are a number of concepts that you will need to familiarize yourself with before we embark on the configuration.
Term Store This is the database in which our managed metadata is stored in.
Term set is a collection of related terms.
Term is a word or a phrase that can be associated with an item in SharePoint Server 2010.
Managed Metadata Service Permissions configuration
Powershell Script :->
Write-Output “Managed Metadata Service Application Permissions”
$spapp = Get-SPServiceApplication -Name “Managed Metadata Service”
$spguid = $spapp.id
$security = Get-SPServiceApplicationSecurity $spguid -Admin      
Grant-SPObjectSecurity $security -Principal “Domain\username” -Rights “Full Control”
Set-SPServiceApplicationSecurity $spapp $security –Admin
(Get-SPServiceApplicationSecurity $spapp -Admin).AccessRules
 
Central Admin ->Application Management-> Manage Service Application->Managed Metadata Service, clicking not on the word but on the bar next to the phrase, you can click in the ribbon a few options, first, Administrator


The Administrator Dialog


Add Term Store Administrators
You must be a Farm administrator or a Term Store Administrator to designate Term Store Administrators. After individuals have been designated as Term Store Administrators, they will then have the ability to designate other Term Store Administrators 

  Powershell ->

   Write-Output “Term Store Administrators” 

   $taxonomySite = get-SPSite “http://centraladminurl
    #Connect to Term Store in the Managed Metadata Service Application
    $taxonomySession = Get-SPTaxonomySession -site $taxonomySite
    $termStore = $taxonomySession.TermStores[$metadataService]
    $termStore.AddTermStoreAdministrator(“Domain\Username”)

    #Update the Term Store
    $termStore.CommitAll()
    $taxonomySite.Dispose()


Once you have done that, now you can create a new Group and then Term Stores within.

Create a new term in Managed Metadata
Powershell ->

#Connect to Central Admin
$taxonomySite = get-SPSite http://centraladminsite:port
#Connect to Term Store in the Managed Metadata Service Application
$taxonomySession = Get-SPTaxonomySession -site $taxonomySite
$termStore = $taxonomySession.TermStores[“Managed Metadata Service”]
write-host “Connection made with term store -“$termStore.Name
#Connect to the Group and Term Set
$termStoreGroup = $termStore.CreateGroup(“Group Name”)
$termStoreGroup .Description = “Group description”   
$ termStoreGroup.AddGroupManager(“Domain\\User”)
$termStoreGroup.AddContributor(“Domain\\User”)

$termSet = $termStoreGroup.CreateTermSet(“Term Set Name”)
#Create term, term description, and a synonym
$term = $termSet.CreateTerm(“Test Term”, 1033)
$term.SetDescription(“This is a test”, 1033)
$term.CreateLabel(“This is a test synonym”, 1033, $false)
#Update the Term Store
$termStore.CommitAll()

Posted in SharePoint 2010 | 1 Comment

PowerShell Script – Marking a parameter as required/optional

param(
      [string] $param1 = $(throw “required param”),#throw exception if no value provided.
      [string] $param2,#an optional parameter with no default value.
      [string] $param3 =”default value”, #an optional parameter with a default value.
      [string] $param4 = $(Read-Host -prompt “param4 value”), #prompt user for value if none provided.
      [string] $param5 = $( if($thisinput -eq “somevalue”) { “defaultvalue1” } else { “defaultvalue2” } ) #conditional default value  
      )

Posted in SharePoint 2010 | Leave a comment

PowerShell for SharePoint 2010

SharePoint 2010 ships with some 531 PowerShell cmdlets giving administrators ultimate power over their SharePoint server. I wish this post will help you get started with it.

SharePoint PowerShell “snapin”  is installed on any server on which you performed installation of SharePoint 2010 front end server or application server 

  •  On the Start menu, click SharePoint 2010 Management Shell,
  •  Or in a regular PowerShell session, execute: Add-PSSnapin

Microsoft.SharePoint.Powershell

Getting Help

Get help for a cmdlet:

Get-Help Get-SPSite

Get a list of all SharePoint cmdlets:

Get-Command -Module Microsoft.SharePoint.PowerShell

Wildcard search for a cmdlet:

Get-Command *Backup*

Finding out which properties and methods an object emitted by a cmdlet has:

Get-SPWeb | Get-Member

Permissions 

To grant these permissions sufficient to use PowerShell for SharePoint 2010,use Add-SPShellAdmin cmdlet and specify the user and the databases to which the user needs access, e.g.

Add-SPShellAdmin -UserName contoso\velaskec -database

(Get-SPContentDatabase -webapplication http://sitename)


try {

Write-Output “Setting permissions” | Out-File $logFile -append

New-SPUser -UserAlias ($comp.Name + “\User1”) -Web $siteUrl -SiteCollectionAdmin

New-SPUser -UserAlias ($comp.Name + “\User2”) -Web $siteUrl -Group “Home Owners”

New-SPUser -UserAlias ($comp.Name + “\User3”) -Web $siteUrl -Group “Home Members”

New-SPUser -UserAlias ($comp.Name + “\User4”) -Web $siteUrl -Group “Home Visitors”

} catch [Exception] { Write-OutPut $_.Exception.ToString() | Out-File $logFile -append}

To Create a new WebApplication

try

{ 

$comp = Get-WmiObject -Class Win32_ComputerSystem

$hostHeader = “mywebsite.com”

$port = 80

$siteUrl = “http://” + $hostHeader

$appPoolName = “SharePoint – ” + $hostHeader + $port

$solPath = (Get-ChildItem (“..\bin\Debug\” + $solName)).FullName

$ownerAccount = [System.Security.Principal.WindowsIdentity]::GetCurrent().Name

$logFile = $workFolder + “\ReinstallPersonalDev.log”

$appName = “My Web Site”

$appPoolAccount = “domain\username ”

$databaseName = “Mywebsite_Content_” + $comp.Name

$databaseServer = “MyDatabase”   

} catch [Exception] { Write-OutPut $_.Exception.ToString() | Out-File $logFile -append}


Delete WebApplication


try {

       Write-Output “Deleting web application” | Out-File $logFile -append

Remove-SPWebApplication -Identity $siteUrl -DeleteIISSite:$true -RemoveContentDatabases:$true -Confirm:$false | Out-File $logFile –append 

       Start-Sleep -Seconds $deploySleepSecs | Out-File $logFile -append

       } catch [Exception] { Write-OutPut $_.Exception.ToString() | Out-File $logFile -append}


Recycling app pool 

try {

Write-Output “Recycling app pool” | Out-File $logFile -append

$appPool = Get-WMIObject -NameSpace “root\MicrosoftIISv2” -Class “IIsApplicationPool” | Where-Object {$_.Name -eq “W3SVC/APPPOOLS/$appPoolName”}

$appPool.Recycle() | Out-File $logFile -append

} catch [Exception] { Write-OutPut $_.Exception.ToString() | Out-File $logFile -append}

 To create a new SiteCollection

 try {

Write-Output “Creating site collection” | Out-File $logFile -append

New-SPSite -Url $siteUrl -OwnerAlias $ownerAccount -Name $rootTitle -Template $rootTempl -Confirm:$false

Start-Sleep -Seconds $deploySleepSecs | Out-File $logFile -append

} catch [Exception] { Write-OutPut $_.Exception.ToString() | Out-File $logFile -append}

 To get the number of site collections: 

(Get-SPSite).Count 

To remove all site collections without confirmations: 

Get-SPSite | Remove-SPSite -Confirm:$false

 To Delete a SiteCollection

 try {

Write-Output “Deleting site collection” | Out-File $logFile -append

Remove-SPSite -Identity $siteUrl -Confirm:$false | Out-File $logFile -append

} catch [Exception] { Write-OutPut $_.Exception.ToString() | Out-File $logFile -append}

 To create new site:

try {

Write-Output “Creating first-level sites” | Out-File $logFile -append

New-SPWeb -Url ($siteUrl + “/” + $firstSiteUrl) -Name $ firstSiteTitle -Template $templName

Start-Sleep -Seconds $deploySleepSecs | Out-File $logFile -append

}catch [Exception] { Write-OutPut $_.Exception.ToString() | Out-File $logFile -append}

 To create new task list in all sites:

 Get-SPWeb | ForEach {$_.Lists.Add(“My Tasks”, “”,$_.ListTemplates[“Tasks”])} 

To create new task list in site:

 Get-SPWeb $url | ForEach {$_.Lists.Add(“My Tasks”, “”,$_.ListTemplates[“Tasks”])}

 To enumerate available workflows: 

Get-SPWeb $url | Select -Expand WorkflowTemplates | Select Name 

To enumerate all document libraries in your site: 

Get-SPWeb $url | Select -Expand Lists | Where {$_.BaseType -eq “DocumentLibrary”} 

Adding solutions 

$solPath = (Get-ChildItem (“..\bin\Debug\” + $solName)).FullName

try {

Write-Output “Adding solutions” | Out-File $logFile -append

Add-SPSolution -LiteralPath $solPath -Confirm:$false | Out-File $logFile -append

Start-Sleep -Seconds $deploySleepSecs | Out-File $logFile -append

} catch [Exception] { Write-OutPut $_.Exception.ToString() | Out-File $logFile -append}

 Installing solutions

 try {

Write-Output “Installing solutions” | Out-File $logFile -append

####TODO: use line below after we have webapp-scoped items in solution, now must be deployed globally

#Install-SPSolution -Identity $solName -WebApplication $siteUrl -GACDeployment -Confirm:$false -force

Install-SPSolution -Identity $solName -GACDeployment -Confirm:$false -force | Out-File $logFile -append

Start-Sleep -Seconds $deploySleepSecs | Out-File $logFile -append

} catch [Exception] { Write-OutPut $_.Exception.ToString() | Out-File $logFile -append}

 Uninstalling solutions

 try {

Write-Output “Uninstalling solutions” | Out-File $logFile -append

####TODO: use line below after we have webapp-scoped items in solution, now must be deployed globally

#Uninstall-SPSolution -Identity $solName -WebApplication $siteUrl -Confirm:$false | Out-File $logFile -append

Uninstall-SPSolution -Identity $solName -Confirm:$false | Out-File $logFile -append

Start-Sleep -Seconds $deploySleepSecs | Out-File $logFile -append

} catch [Exception] { Write-OutPut $_.Exception.ToString() | Out-File $logFile -append}

 Removing solutions

 try {

Write-Output “Removing solutions” | Out-File $logFile -append

Remove-SPSolution -Identity $solName -Confirm:$false | Out-File $logFile -append

Start-Sleep -Seconds $deploySleepSecs | Out-File $logFile -append

} catch [Exception] { Write-OutPut $_.Exception.ToString() | Out-File $logFile -append}

 Activating Feature

 try {

Write-Output “Activating feature” | Out-File $logFile -append

Enable-SPFeature -Identity featureName -Url $siteUrl -Confirm:$false

} catch [Exception] { Write-OutPut $_.Exception.ToString() | Out-File $logFile -append}

 Working with Content 

Show all items in a site: 

Get-SPWeb $url | Select -Expand Lists | Select -Expand Items | select

Name, Url 

Show only documents:

Get-SPWeb $url | Select -Expand Lists | Where {$_.BaseType -eq

“DocumentLibrary”} | Select -Expand Items | select Name, Url

 Search for item: 

Get-SPWeb $url | Select -Expand Lists | Select -Expand Items | Where

{$_.Name -like “*.doc”} | select Name, Url 

To create a new document in a document library: 

function New-SPFile($WebUrl, $ListName, $DocumentName,$Content)

{

$stream = new-object System.IO.MemoryStream

$writer = new-object System.IO.StreamWriter($stream)

$writer.Write($content)

$writer.Flush()

Get-SPWeb $WebUrl | ForEach {$_.Lists[$ListName]} | ForEach

{$_.RootFolder.Files.Add($DocumentName, $stream,

$true);$_.Update()}

}

New-SPFile -WebUrl “http://mycompany/sites/mysite” -ListName

“Shared Documents” -DocumentName “MyFirstDocument” -Content

“Power Blues” 

Recycle Bin 

To find an item by its name in the Recycle Bin for a site:

(Get-SPWeb “http://sp2010dc” ).RecycleBin | Where {$_.Title -match “cool”} 

Then use the item ID to restore it:

(Get-SPWeb “http://sp2010dc” ).RecycleBin.Restore( -“b23d2d41-cd6a-4471-a89 1 -c86f83563e11” ) 

For Site Collection Recycle Bin use:

(Get-SPSite).RecycleBin

Posted in SharePoint 2010 | 1 Comment

Hiding The Title Field -SharePoint List

When you create lists by default there is a TITLE column created. When a user fills out the list details you don’t want this field to be displayed. How can I hide this field?

Solution

After creating a SharePoint list, click on List Settings as shown below:

Click on Advanced Settings under General Settings:

Then, under Content Types – Allow management of content types set it to YES. By default it is NO and click OK.

You will be then re-directed to the List Settings page and if you notice there is a new option available as Content Types. Click on “Item” under this.

You will then see the below screen. Click on “Title” under Columns. As this is a new list I didn’t create any additional columns. If you have created any columns you would see them under the Columns section.

You will see the below screen and then choose Hidden (will not appear in forms). That’s it!.Simple, yes?

This is it!!!! To check, if you go to the list and click on new item you will see that Title is not there…enjoy!!!

Posted in Sharepoint | Leave a comment

Multilingual sites in SharePoint MOSS 2007

Microsoft attempted to provide a solution with SharePoint 2007 multilingual site publishing.

Step 1: Install the Operating system’s Language PacksIt is important to install the language specific files for the operating system, in this case Windows Server 2008:

Step 2: Install the WSS 3.0 and MOSS 2007 language packs on the Web Front End servers

Figure 1: French Language installationImportant: In contrary to what several blogs and white papers suggested by recommending the installation of the ‘MOSS language pack only, it is important to install the language packs for both WSS 3.0 and MOSS 2007 and their respective service packs.The first step in configuring a multilingual SharePoint environment is to install the language packs for each language on all Web Front End servers. If you installed SharePoint in just English and need to be able to publish in English and French, you are going to need to install the French language packs. Should you need to publish additional languages, you are going to need to install the language packs for those languages separately. The respective language ID is created in c:\Program Files\Common Files\Microsoft Shared\web server extensions\12\template\There is a specific language ID for each language.

Language Identifier
English 1033
French 1036
German 1031
Arabic 1025

Run the SharePoint Products and Technologies Configuration Wizard

Step 3: Create the top level site collectionIt is important to use a publishing site in order to leverage variations in a multilingual environment.Go to Central Administration > Application Management > Click CreateSite CollectionUnder Select a Template, click Publishing and select any of the publishing templates.

Step 4: Enable Site Variations

  • On the new top-level site, Go to Site Actions > Under Site Collection Administration, ClickVariations
  • Under Location, enter a forward slash (/)
  • Review the settings and choose the desired options
  • Click OK


Figure 2: Set Variation

Step 5: Configure Variation Labels

  • Create the “Root” label (English)
    • Go to Site Settings->Site Collection Administration
    • Click Variation Labels
    • On the ‘Variation Labels’ screen, click ‘New Label’ and create an English label
    • Remember to check Set this variation to be the source variation (see screenshot)

Note: You may simply choose a Publishing Site or a Publishing Site with Workflow. Some people find the workflows annoying as SharePoint sends a notification at each variation event.

  • Click OK.

  • Create the French label
    • Go to Site Settings->Site Collection Administration
    • Click Variation Labels
    • On the ‘Variation Labels’ screen, click ‘New Label’ and create the French label (see screenshot)
  • Note: You may create more labels for additional languages providing you have installed their language packs.Step 7: Set the browser default languageSetting the right default language for site users is very important as it allows the browser to automatically direct users to their language site

    • Tools > Internet Options
    • Under General, Click Languages and Add
    • Select French (for this Scenario) and Click OK

    Note: You could have your default language (i.e. English) listed and remove any other language in theLanguage Preference list. Or you may have several languages listed but you are going to need to have your default language moved on the top of the list by using the “Move up” button.Important: In the French site, all the system generated content is automatically translated in to French. However, navigation items and propagated content would need to be manually translated by a human being. Finally, as content managers start adding content to the site root site (English), they may leverage the site’s “Translation Management Library” and workflow to assign translation tasks to French translators for the content translation into French.

    Limitations and workarounds

    There are limitations to using multilingual SharePoint. Here is a few of them:Search:
    The default search result page for the French site displays in English. There are two alternatives to alleviate the issue:

    • Option 1: create a separate Search Center in each variation site
    • Option 2: customize the default Search Center to auto-detect the language and display the result in that particular language

    Web Parts:

    • When you add a Web Part into the root site (English), the same Webpart appears in the variation site (French). And when you translate that Webpart in the variation site (French), it will also appear in the English. In reality, the same Webpart is showing up on both places. Consequently, I recommend turning off the Update Target Page Webpart option under the site’s Variation Settings
    Customizing/Troubleshooting variations

    The SharePoint timer executes the variation process like any other automated or scheduled SharePoint process.

    • The first troubleshooting tip is to always review your variation logs:
      • Go to Site Settings->Site Collection Administration > Variation Logs
    • You may troubleshoot or customizing sites’ variations by viewing the objects’ relationship by inserting the following section at the end of the site collection URL: Relationships%20List/AllItems.aspx (i.e.: http://mossdev00:4001/sites/multilingual/Relationships%20List/AllItems.aspx)
      • Variation Manifest file (XML): Open the manifest page using STSADM
      • Correlate the Group ID & Object ID with those in the relationships page

    ConclusionMOSS 2007 provides support for multiple languages deployments in a single framework in order to server corporate users across the globe. Despite some limitations, the MOSS 2007 publishing feature allows the propagation of content across variations sites.

    Posted in Sharepoint | Leave a comment

    Exporting Data Grid to Excel Sheet –ASP.Net,c#

    Exporting datagrid to Excel:


    Exporting datagrid to excel might sounds complex but its pretty simple. Let’s see how this can be done.

    1st Option 2nd Option
    Response.Clear(); Response.AddHeader(“content-disposition”, “attachment;filename=FileName.xls”); Response.Charset = “”; Response.Cache.SetCacheability(HttpCacheability.NoCache); Response.ContentType = “application/vnd.xls”; System.IO.StringWriter stringWrite = new System.IO.StringWriter(); System.Web.UI.HtmlTextWriter htmlWrite = new HtmlTextWriter(stringWrite); myDataGrid.RenderControl(htmlWrite); Response.Write(stringWrite.ToString()); Response.End();       #region Create Excel Sheet
                                   string strFileName = @”Report.xls”;                   // create the DataGrid and perform the databinding
                       System.Web.UI.WebControls.DataGrid grid = new System.Web.UI.WebControls.DataGrid();
                       grid.HeaderStyle.Font.Bold = true;
                       grid.DataSource = dtTable;
                       grid.DataBind();
                       grid.DataMember = dtTable.TableName;                   using (StreamWriter sw = new StreamWriter(strFileName))
                       {
                           using (HtmlTextWriter hw = new HtmlTextWriter(sw))
                           {
                               grid.RenderControl(hw);
                           }
                       }
                   #endregion

     The code given above is the complete code to export the datagrid to excel file.

    • Response.AddHeader is letting Asp.net know that we are exporting a file which is named FileName.xls
    • Response.ContentType denotes the type of the file being exported
    • myDataGrid.RenderControl(htmlWrite) which writes the data to the HtmlTextWriter
    • Response.Write(stringWrite.ToString()); which send the request to the response stream.

    As you can see exporting the datagrid to excel is pretty simple.

    Exporting the datagrid to word file:

    You can also export the datagrid to the word file. You might ask a question that why would anyone like to do that. If you have a word document which needs table than you can simple export the table from the datagrid to the word document. The code is similar to the above with little minor changes.

    Response.Clear(); Response.AddHeader(“content-disposition”, “attachment;filename=FileName.doc“); Response.Charset = “”; Response.Cache.SetCacheability(HttpCacheability.NoCache); Response.ContentType = “application/vnd.word“; System.IO.StringWriter stringWrite = new System.IO.StringWriter(); System.Web.UI.HtmlTextWriter htmlWrite = new HtmlTextWriter(stringWrite); myDataGrid.RenderControl(htmlWrite); Response.Write(stringWrite.ToString()); Response.End();


    • The only changes we made is in bold.

    Exporting the datagrid to a Text File:

    Sometimes you need to export the whole datagrid to a text file. In this case you need to iterate through the dataset and concatenate the text to string or more precisely StringBuilder object. Let’s see how this can be done.

    Database db = DatabaseFactory.CreateDatabase(); DBCommandWrapper selectCommandWrapper = db.GetStoredProcCommandWrapper(“sp_GetLatestArticles”); DataSet ds = db.ExecuteDataSet(selectCommandWrapper); StringBuilder str = new StringBuilder(); for(int i=0;i<=ds.Tables[0].Rows.Count – 1; i++) { for(int j=0;j<=ds.Tables[0].Columns.Count – 1; j++) { str.Append(ds.Tables[0].Rows[i][j].ToString()); } str.Append(“<BR>”); } Response.Clear(); Response.AddHeader(“content-disposition”, “attachment;filename=FileName.txt“); Response.Charset = “”; Response.Cache.SetCacheability(HttpCacheability.NoCache); Response.ContentType = “application/vnd.text“; System.IO.StringWriter stringWrite = new System.IO.StringWriter(); System.Web.UI.HtmlTextWriter htmlWrite = new HtmlTextWriter(stringWrite); Response.Write(str.ToString()); Response.End();

    The important thing to note is the two for loops that iterates through the dataset and append the rows into the StringBuilder object.

    Posted in Sharepoint | Leave a comment

    Step-by-step instructions to create a new SharePoint site column

     Step-by-step instructions to create a new SharePoint site column, which you can then add to a SharePoint list or document library.Site columns are used in SharePoint as metadata on documents. Document types in SharePoint are defined through content types.The scope of a site column

    1. The availability of a site column on SharePoint sites, depends on the SharePoint site you create the site column on.
    1. The availability of a site column follows the site hierarchy in SharePoint, which means that a site column is available on a site and all sites beneath that site. A site column is not available on SharePoint sites above the site on which the site column is created.

    To create a SharePoint site column:In SharePoint, determine the top-most site on which you want to create the site column, and go to that SharePoint site.

    1. On the Site Actions menu, click Site Settings.
    2. On the Site Settings page under Galleries, click Site columns.
    3. On the Site Column Gallery page, click Create.
    4. On the New Site Column page, enter a Name and select a Type for the site column.
    5. On the New Site Column page, select Custom Columns from the Existing group drop-down list box.
    6. On the New Site Column page, select or enter any other information you require for the site column, and click OK.

    The SharePoint site column is now ready to be added to SharePoint lists and document libraries on the SharePoint site on which you created the site column and all of its subsites.Site columns are availbe for top level sites and its child site

    Posted in Sharepoint | Leave a comment

    Step by step Site Content type in MOSS 2007


    Step procedures for creating site content type and how we can use this created site content type in the various libraries and lists.

    What is Site Content Type?

    Site content type is nothing but Meta data. It adds additional information for the documents which is in the libraries/lists in SharePoint and this is called data about data.We can use same content type for the succeeding sites document libraries or lists when it’s created once. Main advantage of this site content type is very much helpful for content searching, document routing, workflows etc., following same contracts (Templates) for all the libraries or lists in the SharePoint site within the organizations.

    The scope of content types

    Content types follow the same scoping rules of site columns, that is, scoping works down a SharePoint site hierarchy, and not upwards or sideways, which means that:

    1. A site content type is available to all child sites down the site hierarchy.
    2. A site content type that has been defined in the root site of a SharePoint site collection is available to all sites and child sites in that site collection, but not available to sites and subsites in a different site collection.
    3. A site content type that has been defined in a child site is not available in the parent site of that child site.
    4. A site content type that has been defined in a site is not available to a non-child site that is in the same site collection as the first site.

    Benefits of using content types

    1. A benefit of using content types is that you can define a document type and its metadata once, and then reuse this document type in all sites that are within the scope of the site where the content type lives.
    1. Another benefit of using content types is that Windows SharePoint Services (WSS) 3.0 allows you to use more than one content type on one list, which means that you can store different types of documents within one document library.

    Let’s see, how to create Site Content Type and how to add this site content type to any of the document libraries/ lists in the SharePoint Site.

    Steps to Create Site Content Type

    Step 1: We need to create new site content types Galleries section in Site Actions – > Site Settings. It will look as the below screen,

    Step 2: Click on that Site content types link for creating new Site Content types. In the coming screen we can see all the predefined site content type which is available for the site collections as below,

    Step 3: Then in the above screen, we can edit existing content type or we can create new site content type. Now we will create new site content type by clicking on that Create link. Then we will see the page as below,

    Step 4: In the above screen, we need to give Site Content type name, description, Parent Content type and the place where to put this new content type. Parent Content type is to inherit its properties into our new content type. We can specify new group name to place our new content type or we can give existing one. In this sample, am going to have existing group for storing my new site content type and click ok button.

    Step 5: Then we can see all the settings, columns for our new site content type as below,

    Step 6: Under settings section, we can see the title, description, group of the site content type. In the advanced settings, we may update existing template for this site content type. We can set workflow settings for this site content type. Under Columns section, we can see two existing columns for this content type. If we want then we could add new or existing columns for this site content type.

    Step 7: Now we will add one existing column for this site content type by clicking on that Add from existing site columns link and we can see upcoming page as below to add new columns.

    Step 8: As we see in the above screen, am adding Department column for this site content type and click ok. Now we have three columns for this site content type as below,

    Step 9: So for, we have created new site content type. Now we need to add this site content type to any of the document library. Now am going to add this content type to My Documents document library. So am going to advance settings of my documents library andallow site content type to this library by selecting yes option as below,

    Step 10: Then, I need to add my Site Content type to my documents library in the document library settings. Under Content Types section, I am going add my site content type by clicking on the link Add from existing site content type as below,

    Step 11: We need select our Site Content Type from Custom Content Types group and click ok to have this content type for our document library as below,

    Step 12: Now we can see our new site content type in our document library New Menu like,

    Step 13: Ms Office will open new document by clicking on that Demo Type content type as below,

    Now we could see our two site content type columns. There user has to enter his title and department name as Meta data for this document.

    Posted in Sharepoint | Leave a comment

    Step By Step Guide to List Events Handling in SharePoint


    In SharePoint 2007 it is possible to handle events that occur on list items. These types of events come in two flavours: synchronous and asynchronous.

    Synchronous: happens ‘before’ the actual event, you have the HttpContext and you can show an error message in the browser and cancel the event

    Asynchronous: happens ‘after’ the actual event, there’s no HttpContext and you cannot directly show an error message or cancel the eventBy subclassing Microsoft.SharePoint.SPItemEventReceiver you can override the desired “event” methods.

    Synchronous: methods ending with ‘-ing’ (ItemAdding, ItemUpdating, …)

    Asynchronous: methods ending with ‘-ed’ (ItemAdded, ItemUpdated, …)

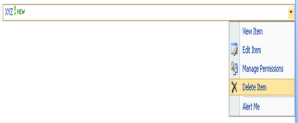
    Objective:The objective of this article is to give a very basic explanation of how to catch an event on a SharePoint list and deploy them programmatically. I will achieve in this article “User will get error message; whenever any item will get deleted from a particular list “.

    What is Event?

    Event handling gives developer the ability to catch certain user actions in code and react programmatically.

    Steps to handle List in SharePoint

    1. Create a class that will extend SPListEventReceiver or SPItemEventReceiver class. These are classes ofMicrosoft.SharePoint.dll assembly.
    2. Sign the class library with strong name.
    3. Deploy the class library to GAC
    4. Deploy the event receiver assembly.

    Creating the class

    1. Create a new project of type class library. name it as eventhandlersampleclasslibrary.extend the class with SPItemEventReceiver. The purpose of extending this class is that we are going to handle events on a particular item of a list.

    Note: I am going to handle the Item Deleting event on a particular list. I will not allow any user to delete any item in that list.Event Handler Class

    using System;

     using System.Collections.Generic;

    using System.Linq;

    using System.Text;

    using Microsoft.SharePoint;

    namespace eventhandlersampleclasslibrary

    {   

      public class Class1 :SPItemEventReceiver  

      {   

        public override void ItemDeleting(SPItemEventProperties properties)    

      {     

      //base.ItemDeleting(properties); 

        string errorMessage = “Please Do not delete “;

      properties.ErrorMessage = errorMessage; 

      properties.Cancel = true;    

     }  

      }

    }

    Signing the class name

    1. Right click on Project and then Properties.
    2. Now click on signing tab.
    3. Check the Sign the Assembly checkbox.
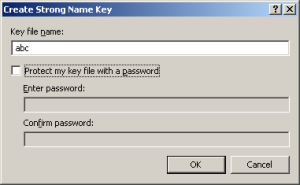
    4. For selecting the Strong name key file , select New option from drop down
    5. Give a strong name. I am giving the name abc here.
    6. Make sure Password protection checkbox is unchecked.
    7. After this; you would be able to see abc.snk in solution explorer.

    Deploying the class library to GAC

    1. Open the command prompt
    2. Change directory to Program Files\Common Files\ Microsoft Shared\ web server extension\12\Bin

    Type the command gacutil /I complete path of the dll of class created as eventreceiver class in step1Gacutil /I [Complte path of dll of class]The above command will deploy the dll in Gac assembly.Deploy the Event Receiver assemblyThis step could be done I either in three ways

    1. Through code
    2. Through Stsadm command ( Features)
    3. Through the content types

    I am going to deploy using the program.

    1. Either create another project of console type or add class to any existing project.
    2. Add the reference of SharePoint dll.
    3. Return the Site Collection using SPSite.
    4. Return the top level site using SPWeb.
    5. Return the list using SPList.
    6. Add the event in the list using SPEventRecieverDefinition.
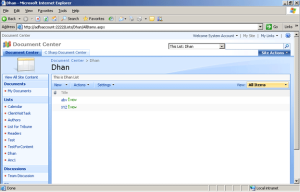
    7. Dhan is the name of the list which event I am going to capture.

    Class name is the name of the class, you created in step1.Assembly is the assembly information of the dll in GAC. To get information about dll in GAC follow below steps.a. Go to Start -> Runb. Type Assemblyc. Window will open; seek for dll you added.

    d. Right click there and go to properties for all the information.

    e. In Type select ItemDeleting.f. Then call the update method.

    Console Application –Deploy event handler

    using System;

    using System.Collections.Generic;

    using System.Linq;

    using System.Text;

    using Microsoft.SharePoint;

    namespace ConsoleApplication1

    { 

    class Program

    {  

     static void Main(string[] args)  

     {     

     SPSite spsite = new SPSite(“http://adfsaccount:2222/&#8221;);      SPWeb mysite = spsite.OpenWeb();

     SPList theList = mysite.Lists[“Dhan”];    SPEventReceiverDefinition newReceiver = theList.EventReceivers.Add();   

     newReceiver.Class = “eventhandlersampleclasslibrary.Class1”;    newReceiver.Assembly = “eventhandlersampleclasslibrary,Version=  1.0.0.0,Culture=neutral,PublicKeyToken=fd7c0a9671b2ae14”;    newReceiver.SequenceNumber = 5000;  

     newReceiver.Type = SPEventReceiverType.ItemDeleting;    newReceiver.Update(); 

      Console.Read(); 

     } 

    }

    }

    Now the event has been deployed.Output

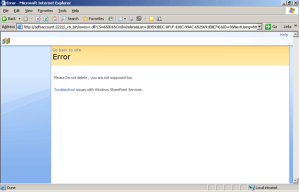
    When  tried to delete the item

    Whenever any item will get deleted user will get error message.

    Done!!

    Posted in Sharepoint | Leave a comment

    Simple Content Management System for WSS V3


    The name SCMS stands for Simple Content Management System. SCMS is a web content management system for the Microsoft SharePoint services V3.
    It allows to set up web sites in a Sharepoint V3 or a MOSS 2007 environment.

    SCMS is based on the Windows SharePoint Services Version V3. These are familiar with Windows 2003 Server and the following licensed. SCMS is developed for both, the WSS V3 and Microsoft Office SharePoint Server (MOSS) 2007.

    Here are some key features of “SCMS”:

    • Full ASP.Net Themes and Skin support
    • Multi Templates and Subtemplates
    • Masterpages
    • Layoutpages
    • Pageversioning (Itemversioning)
    • Checkin / Checkout mechanism of Pages
    • Publising mechanism of Pages
    • On- / Off Time functionality of Pages
    • Workflow integration
    • Security trimmed Navigation
    • Breadcrumb Navigation
    • Full WSS feature driven design
    • 100% Based of WSS V3, wihout any additional database or filesystem
    • Caching functionality
    Posted in Sharepoint | Leave a comment