Debugging the Android Battery

Does android battery suck, or is it usage? In short it does suck compared to other popular alternatives(the i range). However the purpose of this post is not to start a witchhunt or rant but to arm you with tools to debug your battery usage. I will help you track down your battery hog(s) and then suggest some methods to tackle them.

There are 4 main causes of battery hogs:

  1. Cell Phone Usage
  2. Display
  3. CPU usage
  4. Sensors like (GPS, Wifi etc)

Lets start with the easy one:

Cell Phone Usage

Cell tower is the one that provides you connectivity, EDGE and 3G. Unfortunately weak signal can cause this to use exorbitant amount of  battery. If you are experiencing full battery drain in about 2-3 hours then this is most probably the culprit. First thing to do is go Settings -> About Phone -> Battery Use -> Cell Phone standby. Look @ Time spent without signal. Any number other than 0 is very dangerous. There are no practical solutions to this problem. Search for network and fix it. This will prevent phone from searching network when signal is weak. However this may not work when you go on roaming and if you spend most time out of signal this will still consume battery.

Display

The only downside of having a large screen is that it consumes exponential charge. If you using an LCD screen, your phone is only likely to survive 4-5 hrs of screen on time. This is assuming that you are not performing any CPU intensive task during that period like gaming, video etc. It is highly likely that you will consume 4 hrs of usage out of your phone in the entire day hence its unlikely that your phone will survive more than a day. The only aspect to debug here is if some freaky software or buggy ROM is keeping your screen up. Gingerbread provides you clean interface to check your screen on period. You can use Juice Plotter on non gingerbread phones but it has been known to consume a lot of battery itself. Make sure you only use to to debug your screen and not on a regular basis.
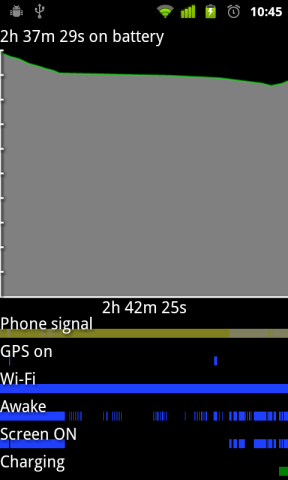
Have a look at your Screen ON time and make sure you are getting around 4 hrs of usage. Any thing less than that means that you have issues with your battery. Look through the CPU Usage and Sensor usage area  debug those issues.

Solutions:

  1. Choose an AMOLED screen phone: AMOLED screens consume very little battery in comparison to LCD Screens.
  2. If you have an AMOLED screen then choose darker themes while browsing/surfing/wallpapers. A light color pixel consumes about 5.8 times more energy than dark pixel. This method will not work for LCD phones. You can see the impact of changed wall paper using Current Widget. This will tell you how much charge your phone is consuming(wait for couple of min for it to refresh when you change the wall paper).
  3. Choose  lower screen brightness in general. Rely on Power control widgets to increase screen brightness when required.
  4. Reduce display timeout to 30sec-1min. Adjust that to a time that is comfortable to you.

CPU usage

Today’s CPU are beast. This means not only they are fast and powerful they consumAndroid allows apps to ask for CPU while not using the screen. e millions of amperes of precious juice(okay maybe not millions). CPU usage is a bit tricky to debug in pre-Gingerbread phones. You are mostly led to superstitious advices to control power usage. You can see as much as 10-20% battery usage overnight when you were not using the screen, this is because  Android allows apps to ask for CPU while not using the screen and poorly designed apps continue to update even when they have not been used in a while draining CPU. Enough rant now to function, to debug CPU:
  1. Launch Spare Parts. Fortunately this is bundled in Gingerbread phones, for Froyo you can try out this market app https://market.android.com/details?id=com.androidapps.spare_parts and hope it will work.
  2. Look at Battery history inside Spare Parts. Select “Other Usage” in first drop down.
  3. Check out Running time vs Screen On time.
If these two numbers are widely different then you have a problem on your hands. This means that some app is keeping CPU awake even when your screen is off. To find out which app
  1. Launch Spare Parts
  2. Look at battery history and select “Partial Wake Usage”
  3. Now you will see which app is the culprit and eating up CPU.
Now comes the hard part . You can reduce your running time by disabling this app. If the app manufacturer is good, he would have provided you means to reduce its battery usage(Disabling sync, changing sync from push to hourly, reducing data refresh etc). If not then you should uninstall the app and use something else for that purpose. Keep repeating this exercise till your running time is almost equal to your screen on time.  You will see radical improvements in your standby time with this exercise which in turn can reduce your charge cycles to as much as 2 days.
Other than choosing good apps which use CPU wisely some suggestions:
  1. Use less push sync in general. True push is only available with Blackberry everybody else is doing a very frequent pull to emulate push, so make sure you don’t use push where its not required.
  2. In my opinion disable auto sync all together and do a manual sync when needed. You can put the auto sync button in your power widget and flick it on and off whenever needed
  3. Use Juice Defender it will give you good usage patterns(disabling sync at night etc).
Solution for Advanced Users: if you need all the apps that sync but still want to reduce your battery usage you can try Set CPU to underclock your CPU. You can also use the inbuilt underclocking baked into the CM7 ROM. This solution will only work if you have rooted your phone and your kernel supports underclocking. Default android kernel comes with OnDemand CPU clocking. CPU almost instantly scales to max frequency(like 1Ghz) from its min frequency(like 245Mhz) when required. You will need this kind of speed for gaming/browsing etc however its not required for sync and other background tasks. Set CPU lets you configure so that
  1. Your CPU scales slowly(Conservating  scaling/Power intensive), especially when you have very little battery left
  2. Reduce highest CPU frequency to something like 700 Mhz especially during the night or when the screen is off
Keep in mind however that these solutions can impact your phones performance while rendering pages, gaming etc, so do not reduce cpu frequency or scaling when your screen is on to prevent frustrating experiences.

Sensor usage

If you have reached here then the problem is quite simple shut off all your sensors :). Well Android provides various ways of debugging sensor usage, have a look at your Spare parts => Battery History => Sensor Usage/GPS Usage. If you see a lot of devices are using GPS Sensor you are likely to see a lot of battery loss. Its unfair that android does not let us control which device has access to my location and which does not, I hope they will add that in future versions of android. Meanwhile if you see useless apps tryto access location(mostly to serve relevant ads etc) then you can adopt the following solutions:
  1. Disable both ways to determine your location in Settings => Location and Security. If you really need location then go for “use wireless location” instead of GPS for location. Use GPS only in critical situations where precise location is very necessary
  2.  Change Wifi sleep policy (in Settings => Wireless and Networks => Wifi Settings => Menu key => Advanced => Wifi Sleep policy => When screen is off) This will switch off your wifi and turn on  mobile network when you are not using the screen. This way your background apps can use your slow mobile network to sync while saving wifi juice.
  3. Turn on “Only 2G network” in (Settings => Wireless and Networks =>  Mobile Networks) . This will switch off your 3G network and use only 2G which uses much less battery and is much slower. You can also use 2G/3G switcher in power widget to control this if you rely on 3G for browsing.
Got any other suggestions?? Let me know in comments…

Apache Mahout 0.2 Released – Now classify, cluster and generate recommendations!

Apache Mahout

Apache Mahout

For the past two years, I have been working with this amazing bunch of people whilst, being paid by Google in their summer of code program in a project called Mahout. And like the name says, it is trying to tame the young beast known as Hadoop. I have received a lot from the community. Being part of the project, I have got some real exposure to Java, data mining, machine learning and hands on experience over distributed systems like Hadoop, Hbase, Pig.  The project is still in its infancy, but, its ambitions are high in the sky. I am happy to announce the second release of the project, and proud to be a part of it. I hope people will adapt it in their projects and that it becomes the defacto standard machine learning library the way lucene and hadoop has become in their respective focus areas.

If you are already excited and want to take it for a ride, read Grant’s article on IBM developerworks here
The release announcement below

Apache Mahout 0.2 has been released and is now available for public download athttp://www.apache.org/dyn/closer.cgi/lucene/mahout

Up to date maven artifacts can be found in the Apache repository at
https://repository.apache.org/content/repositories/releases/org/apache/mahout/

Apache Mahout is a subproject of Apache Lucene with the goal of delivering scalable machine learning algorithm implementations under the Apache license. http://www.apache.org/licenses/LICENSE-2.0

Mahout is a machine learning library meant to scale: Scale in terms of community to support anyone interested in using machine learning. Scale in terms of business by providing the library under a commercially friendly, free software license. Scale in terms of computation to the size of data we manage today.

Built on top of the powerful map/reduce paradigm of the Apache Hadoop project, Mahout lets you solve popular machine learning problem settings like clustering, collaborative filtering and classification
over Terabytes of data over thousands of computers.

Implemented with scalability in mind the latest release brings many performance optimizations so that even in a single node setup the library performs well.

The complete changelist can be found here:

http://issues.apache.org/jira/browse/MAHOUT/fixforversion/12313278

New Mahout 0.2 features include

  • Major performance enhancements in Collaborative Filtering, Classification and Clustering
  • New: Latent Dirichlet Allocation(LDA) implementation for topic modelling
  • New: Frequent Itemset Mining for mining top-k patterns from a list of transactions
  • New: Decision Forests implementation for Decision Tree classification (In Memory & Partial Data)
  • New: HBase storage support for Naive Bayes model building and classification
  • New: Generation of vectors from Text documents for use with Mahout Algorithms
  • Performance improvements in various Vector implementations
  • Tons of bug fixes and code cleanup

Getting started: New to Mahout?

For more information on Apache Mahout, see http://lucene.apache.org/mahout

Creating Indexes/Sorting on very large tables in Mysql

If your dataset is anywhere between 1 million to  180 million then you have come to the right blog.  Normally a procedure like this will require atleast 1 day or more depending on dataset. But I will teach you how to get results in as quick as 3 hrs. You will be able to execute queries on indexes fully utilizing them without going through the painful process of creating them on the the entire table. Recently at work I had to deal with a dataset of 180 million  and this entry gives details of the work flow that I adopted.  I will not effectively sort the complete table but will tell you how to achieve the same effect in less than 2-3 hrs for 180 million rows. I tried well known methods to achieve indexing. I tried to use Alter table statement after 2 hrs stopped it. I tried to dump the data in hope of inserting it in an indexed table but after 1 hr stopped that as well. Then I explored Mysql functionality a bit to discover 3 features which can really reduce time, those were Memory tables, Merge tables and Partitioning(not necessary). Fortunately sorting using merge sort is a recursive job, so in the process of sorting 180 million rows I also had to learn how to sort 2 million faster than normal index creation. So the first thing that you have to do is  find out the order of rows that you have.

If you have less than 1 million rows then you are better off using mysql’s inbuilt commands

Alter table <tblname> create index (<column name>);

If you have more than than then read on…..

The concepts I will be using are as follows:

Memory Tables:

These tables are hash maps that mysql stores in memory. These tables are temporary (in the sense they disappear after mysql server restart)  and have limited rows. However they are lighting fast on index creation or sorting.

Partitioning:

Somebody in Mysql finally realized that to be fast database has to split the data across servers. Finally in version 5 they have introduced partitioning. If you have the luxery of more than 1 server you can use this. I did not have this luxury so will do indexing without it.

Merge tables:

So these are 1 server counterpart of Partitioning. If you want to split your dataset into multiple tables and run single query on all of them you can use Merge tables. They have their own share of problems, but for general functionality of insertion, deletion, searching and dumping, they work great. The only 2 major limitations one that they only work if base tables are MyISAM and searching on them is multiples of logn(see below if interested)

Irrelevant Mathematical jargon(feel free to skip)

So if you search  table on indexed columns then search takes Log(n) time (n = number of tuples). So imagine you have 100*n size of table and you create 100 sub tables of n each. Now searching on one table will take Log(n) time and total time is 100*log(n)=log(n to the power 100). If it were a single table it would have taken Log(100*n) =Log(100)+log(n). So in a single table it scale logarithmically but merge table scales exponentially.

I will explain the steps that I took below, you can customize them to your dataset.

There are several ways of creating index however mine will require you to have quite a powerful machine and a reliable power supply. Atleast 2gb of ram is required and more is better here. If you have around 2 million rows then skip to step 4.

Step 0

This step is about reconnaissance. It will determine the numerical data in the next steps. You need to know the approximate amount of space your row takes. This will determine the size of your memory table. You can determine the size of memory table by trial and error also but a numerical estimate will help.  In the steps below I will assume initial table as client_data and final table as client_data_sorted. All other tables are temp and generated on the spot.

Step 1: Increasing allowed size of Memory table to fit data

The first thing you need to do is extend the allowed memory limit of mysql. To sort faster we will need memory tables. Do so by adding the lines marked as red below under  [mysqld] in my.cnf file. Typically located in /etc/my.cnf or /etc/mysql/my.cnf depending on your distribution.

my.cnf file

[mysqld]

datadir=/var/lib/mysql
socket=/var/lib/mysql/mysql.sock
..
max_heap_table_size=4096M
tmp_table_size=4096M

Adding these lines will ensure that mysql can now take 4GB space for storing memory tables.Feel free to increase this number if you have higher memory but ensure that you dont encounter swapping.

Step 2: Dump data in memory table for indexing

Now you need to create a  memory table with same structure as your final table.

create table client_data_memory like client_data_sorted;
alter table client_data_memory engine=Memory;

The second line alters the engine to memory. The only thing to keep in mind is that memory engine keeps all the data in memory hence if your mysql server restarts or machine restarts then all the data is lost. Ensure that you never rely on them as a reliable storage.

Figure out  how many rows your memory table can contain. In a typical scenario this would be order of 10 million. This value will change depending on your system’s memory and values set in step 1.  You can test it out by inserting data from source table to memory table. After the limit the process will interrupt in the middle giving error like table is full.

Insert into client_data_memory select * from client_data limit <test limit value>;

Ex:  Insert into client_data_memory select * from client_data limit 0,10000000;    # 10 million rows from 0th row

Step 4: Storing data from Memory table to MyISAM table

If you have order of 10 million rows then the process stops for you here. Just use an alter table command to create index on memory table(3-4 minutes) then insert the memory table data into client_data_sorted table. You just saved yourself  hours of pain. If you have more than 10 million then  skip this step.

Alter table client_data_memory add index (<column name>);

(or sort the table)

Insert into client_data_sorted select * from client_data_memory;

If you can store 10million rows in your memory table and total tables are around 40 million then you are better off iteratively repeating the above steps. Merely sort 10 million then insert, then truncate memory table , then insert next 10 million , sort then insert. The process will take exponentially more time every time but still will finish far faster than normal.  If you have more than 40 million then read on. A world of pain awaits you….

Step 5: Create Merge table for accessing data

The above process will not work iteratively for you if you have more than 50 million rows as while inserting you have to merge too. Suppose your memory can store 10 million and you have 180 million rows then create 18 temporary tables of engine type MyISAM.

create table data_temp1 like client_data_sorted;
alter table data_temp1 engine=MyISAM;

Now use the above technique to insert data 10 million a piece into each of these tables. So data_temp0 will contain 0-10 million then data_temp1 will have 10 miliion to 20 million and so forth.

truncate table client_data_memory;insert into client_data_memory select * from client_data limit
0,15000000;insert into data_temp0 select * from client_data_memory;
truncate table client_data_memory;insert into client_data_memory select * from client_data limit
10000000,15000000;insert into data_temp1 select * from client_data_memory;

…….

This will take quite a long time, for me it took 10 min for every 10 million so 180 min in total. Meanwhile consider some of the more worthwhile alternatives like  hive, its too late for it now but its worth a look. This is also useful.

Now create a merge table. A merge table is created on top of several MyISAM tables of same structure. Its important to have same structure and MyISAM tables. You can use this as  a single table however all the searching is performed on all tables and hence is slower than single table.

create table client_data_merge like client_data_sorted;
alter table client_data_merge engine=merge union=

(data_temp0,data_temp1,data_temp2,data_temp3,data_temp4,data_temp5,data_temp6,data_temp7,data_temp8,data_temp

9,data_temp10,data_temp11,data_temp12) INSERT_METHOD=LAST;

Step 5: Final Sorted table(if required)

For most temporary uses this merge table will work. You can use this table normally. Insert data into the table etc etc. However if the limitations of merge tables are not acceptable you have to create the final table  from this merge table. You can use merge tables to dump the data in a sorted fashion according to indexes or simply use

Insert into <tblname> Select * from <merge table> order by <index1>,<index2>…..

This way you get to Insert much faster as the data is already sorted and mysql simply has to insert the data and update the indexes. If this method helped.. do let me know in the comments.

Removing Glycerin: A Trick to make your Indian beer taste like Bud

Why do Indian Beers taste bad? I have had this question buzzing in the back of my mind for quite a long time. Till now I believe that all my friends and colleagues think we Indians just don’t know to make Beer. Like how hard is it?Indian-Beer

In my Tharavadu (Ancestral home), I have drunk pure Toddy made from the sap of a Coconut or Palm Tree. Believe me this light alcoholic drink can blow away all the products of UB group currently in the market. You might have heard of Fenny and other Indian Locally Brewed delights. So with the rich history and wealth of knowledge for creating alcoholic drinks, why do we still suck at making Beer. I got a small tip from my friend Rohit Sakhwalkar (Sakhu) during my recent visit to Gurgaon. A million thanks to him for making not just my day but the whole drinking career ahead :D.

Why do Indian Beers taste bad? The answer is some organic compound which behaves like Glycerin. This is the reason why there is a bitter aftertaste. Yes, Glycerin exists in the alcoholic state as Glycerol. My mother who is a whiz at Organic Chemistry had given me some insight into this molecule. Due to its higher molecular weight and inductive effect of the Hydrogen atoms, Glycerol is less soluble than Ethanol in water. So after a bit of google search and poking around beer forums, I was convinced that this was the culprit behind the bad tase. Glycerin is added to beer as a preservative. As you know Indian climate is close to being ideal for beer storage. But all major sources of information like Wikipedia denies this fact. They also says that pure glycerine is sweet in taste. And that Glycerine is a major constituent of Bio Diesel which is gonna run the vehicles in the future. So basically it is gonna run both man and machine alike.

So with the help of Rohit’s tip, I tried his method of separation of the contaminent from Beer. Here are the steps and photographs of the same

Step By Step: Removal of Glycerin from BeerRemoving-Glycerrine

  1. Get a Glass/tumbler of water.
  2. Open the bottle of beer slowly so as to create less turbulence.
  3. Cover the mouth of the beer with your thumb and slowly turn it upside down with mouth inside the water. This is the trickiest part, ensure you do not shake the bottle and cause the dissolved Carbon Dioxide to effervesce. The reason will be clear below.
  4. As soon as the bottle is upside down you will see thick yellow colored liquid coming out. Which I believe is the organic compound mixed with  the colouring agents in the beer.
  5. Keep it there for some time. Maybe a min or two. I kept it for over 5 mins. Hoping to drain out the stuff completely losing some beer in the process.
  6. Put it back and enjoy the amazing taste of what is actually Beer. Yes my friend that is how Beer tastes like. If it doesnt taste close to Budweiser beer :P, you might have done something seriously wrong. I even feel that Carlsberg is de-glycerinified Kalyani beer, Who knows!. I dont care as long my b rew tastes awesome.

Take look at the only video I found online talking about this. I couldnt take one myself for my camera wasn’t distinguishing the colors
Video showing the removal of Glycerine from beer

Get ready for some geek funda. The science (or atleast my hypothesis) behind this method.

When you put a bottle upside down, the atmospheric pressure is pushing the water in the tumbler, the low pressure created inside the top of the bottle is causing the liquid not to fall down into the tumbler. So at equilibrium, the liquid inside the beer + water starts to settle down based on its density. Glycerine(or whatever Organic compound  being denser than water settles down into the glass of water, Water from the tumbler will go into the beer bottle(but not much, if you dont shake the bottle). If the Carbon Dioxide had started effervescing, the gas content inside the beer bottle would have started increasing, this would have caused the beer to flow into the glass due to increasing air pressure.