Thursday, October 1, 2015
Sunday, September 27, 2015
Tuesday, September 15, 2015
Sunday, September 6, 2015
Wednesday, September 2, 2015

Friday, August 28, 2015

Johnson tiles - loft - beige mix
http://www.johnson-tiles.com/catalog/range/loft/
http://www.johnson-tiles.com/media/filer_public_thumbnails/filer_public/97/4c/974ca5c9-bc10-4bdd-a1e5-3de5c4bef469/absolute_loft_lof01n_floor_chair.jpg__570x570_q85_crop_upscale.jpg

http://www.johnson-tiles.com/media/filer_public_thumbnails/filer_public/97/4c/974ca5c9-bc10-4bdd-a1e5-3de5c4bef469/absolute_loft_lof01n_floor_chair.jpg__570x570_q85_crop_upscale.jpg
Sunday, August 23, 2015
Pop up dinner in derelict flat - rande
http://grubclub.com/rande-pop-up/rande-pop-up-randes-derelict-flat-dinner/3135
Cufflinks for men with style
http://www.alicemadethis.com/collections/full-collection/products/alexander-brass-cufflinks
Saturday, November 1, 2014
Tuesday, October 28, 2014
dandelion paper weight
http://www.hafodgrange.co.uk/index.php?route=product/product&path=59&product_id=66
Tuesday, March 25, 2014
Quote: Life is short
“Imagine life as a game in which you are juggling five balls in the air. You name them - work, family, health, friends, and spirit - and you're keeping all of these in the air. You will soon understand that work is a rubber ball. If you drop it, it will bounce back. But the other four balls - family, health, friends, and spirit are made of glass. If you drop one of these, they will be irrevocably scuffed, marked, nicked, damaged, or even shattered. They will never be the same. You must understand that and strive for balance in your life. “ - Brian Dyson, ex CEO Coca Cola
Sunday, October 20, 2013
Sunday, July 14, 2013
Sunday, April 28, 2013

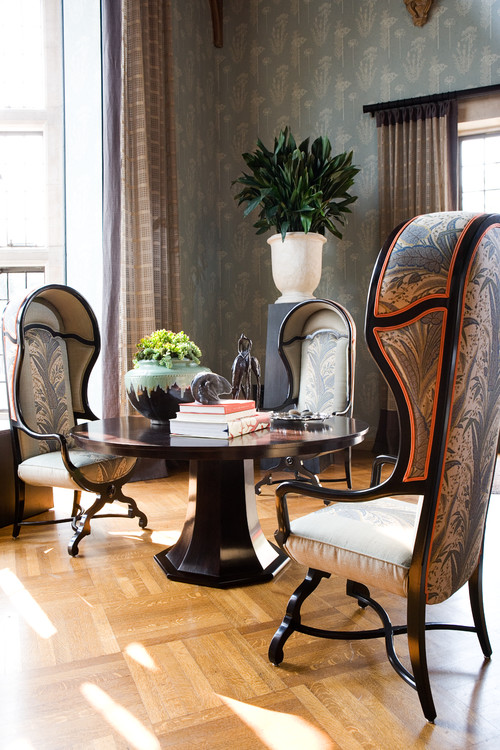
Interiors: St. Pancras hotel - penthouses
FURTHER TO OUR ST PANCRAS TOUR SEE BELOW:
An open, contemporary penthouse has been built into a restored portion of a genuine London landmark, the St Pancras Penthouse by TG Studio. Architect Thomas Griem worked within the guidelines of English heritage to develop a space that was true to the original with a visually contemporary design. From the bedroom at its peak to the living areas below, the fully rehabbed design emphasizes open living in a multi-story space. This three bedroom penthouse features living and dining spaces at its base level, relaxation and work spaces in its center and private bedrooms at the top. In total, it is a remarkably well-designed, finely furnished space that represents the best of penthouse living in central London.
Sunday, April 14, 2013

Saturday, March 30, 2013


Interiors: Chandelier test tubes
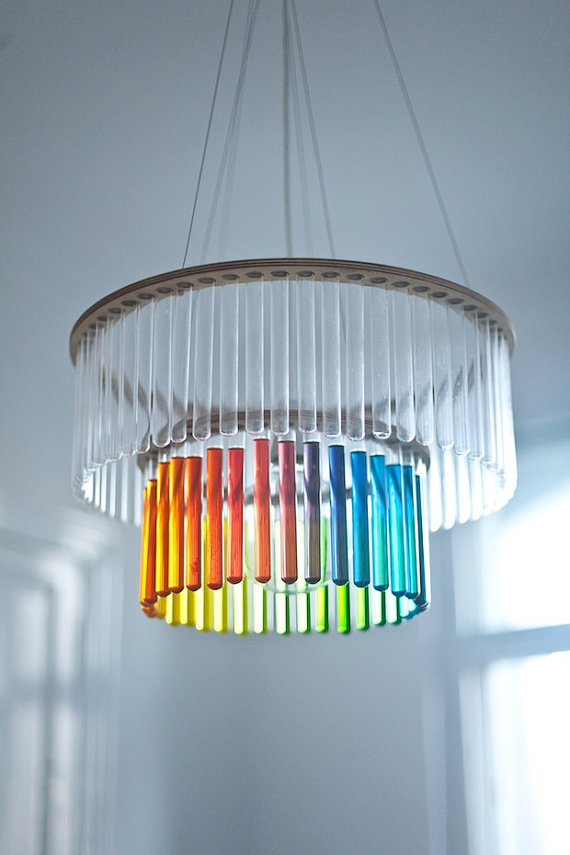 http://www.etsy.com/listing/98746532/maria-sc-double-test-tubes-chandelier?ref=sr_gallery_1&ga_utm_source=new_at_etsy&ga_utm_campaign=new_at_etsy_032613_5300500376_0&ga_utm_medium=email&ga_email_sent=1364328721&ga_euid=rdwHg0H53y4e4J9yBz19pC39jm-b&ga_filters=housewares+flowers&ga_search_type=all&ga_view_type=gallery
Sunday, March 24, 2013
Sunday, March 3, 2013
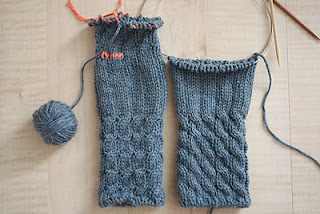
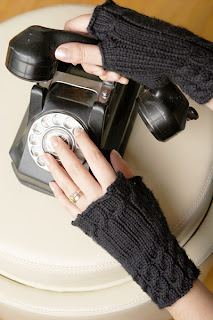
Knitting: fingerless gloves
A time of high stress and not much time left before a big important deadline is, as everybody knows, the perfect time to start a new knitting project. I ripped out my top down raglan experiment sweater for the time being and started in on these fingerless gloves just in time for it to hit 70 degrees in Seattle. These are Fetching from Knitty, made a little longer and using a tubular cast on and bind off. That little section of orange stitches is where the thumb will be picked up to knit.
I’m using some leftover Dark Horse Fantasy yarn on size 6 needles. I’m using two circulars for most of the project, and dpns for the thumbs.
http://www.notmartha.org/archives/2009/04/06/new-knitting-fetching-fingerless-gloves/
 FINISHED MEASUREMENTS
Cuff circumference: 7 inches (unstretched)
Length: 6.25 inches
MATERIALS
Debbie Bliss Cashmerino Aran [55% Merino Wool, 33% Microfibre, 12% Cashmere; Approx. 98yd/89m per 50g ball]; Shown in Olive 501 and Black 300; 1-2 balls [many knitters have completed a pair with just one ball, but every knitter is different. Buy two, and if you don't need both for your first pair, make a second.]
1 set of US #6/4mm double-point needles
Safety pin or split ring marker
Cable needle (a double-point needle may be used if you have a set of 5; only 4 are used for this project)
Approx. 12 inches smooth waste yarn in a contrasting color (mercerized cotton works well)
Tapestry needle
GAUGE
21 sts / 30 rows = 4 inches in stockinette stitch
Note: Yarn is worked more tightly than recommended gauge to produce a firm fabric.
PATTERN NOTES
[Knitty's list of standard abbreviations and techniques can be found here]
C4B: Slip next 2 sts to cable needle (or spare double-point needle) and hold to back of work; k2, k2 from cable needle.
C4F: Slip next 2 sts to cable needle (or spare double-point needle) and hold to front of work; k2, k2 from cable needle.
4x1 Rib (Worked in the round over a multiple of 5 sts):
Round 1: [K4, p1] to end.
Repeat this round for 4x1 Rib.
http://knitty.com/ISSUEsummer06/PATTfetching.html
FINISHED MEASUREMENTS
Cuff circumference: 7 inches (unstretched)
Length: 6.25 inches
MATERIALS
Debbie Bliss Cashmerino Aran [55% Merino Wool, 33% Microfibre, 12% Cashmere; Approx. 98yd/89m per 50g ball]; Shown in Olive 501 and Black 300; 1-2 balls [many knitters have completed a pair with just one ball, but every knitter is different. Buy two, and if you don't need both for your first pair, make a second.]
1 set of US #6/4mm double-point needles
Safety pin or split ring marker
Cable needle (a double-point needle may be used if you have a set of 5; only 4 are used for this project)
Approx. 12 inches smooth waste yarn in a contrasting color (mercerized cotton works well)
Tapestry needle
GAUGE
21 sts / 30 rows = 4 inches in stockinette stitch
Note: Yarn is worked more tightly than recommended gauge to produce a firm fabric.
PATTERN NOTES
[Knitty's list of standard abbreviations and techniques can be found here]
C4B: Slip next 2 sts to cable needle (or spare double-point needle) and hold to back of work; k2, k2 from cable needle.
C4F: Slip next 2 sts to cable needle (or spare double-point needle) and hold to front of work; k2, k2 from cable needle.
4x1 Rib (Worked in the round over a multiple of 5 sts):
Round 1: [K4, p1] to end.
Repeat this round for 4x1 Rib.
http://knitty.com/ISSUEsummer06/PATTfetching.html

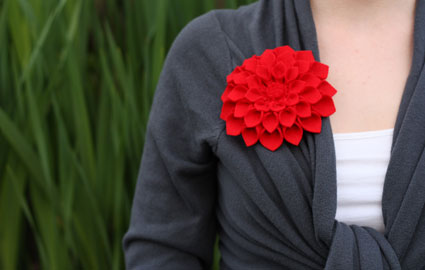
DIY Mother's Day Corsage: Felt Dahlia Flower Brooch
http://news.holidash.com//2010/04/23/mothers-day-corsage/


 This Mother's Day, make something beautiful for Mom. Credit: Megan Reardon
Wondering about what to make Mom for Mother's Day? I've been thinking about traditional gifts like flower corsages and lockets, and I decided to combine the two. This felt dahlia pin has a secret pocket in the back that can hold a picture or message for your favorite mom.
You'll need:
- scissors
- Fabri-tac adhesive
- two sheets craft felt, one for the flower and one in a contrasting color for the back
- needle and thread
- brooch pin (available in the beading section of craft stores)
- a bit of thin cardboard (a cereal box from your recycling bin will be perfect for this)
Credit: Megan Reardon
Also helpful, if you have them:
- pinking sheers
- a rotary cutter, mat and ruler
- a sewing machine
Credit: Megan Reardon
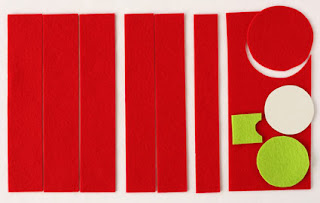
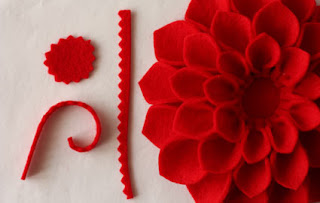
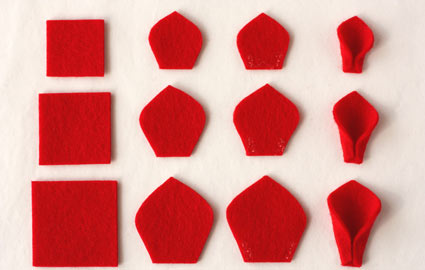
We'll be cutting out a bunch individual petals, and above I show what I think is the most efficient way to divide up your sheet of felt. First cut a 3.25 inch diameter circle from your flower color felt. (Do this first to make sure you don't leave yourself too small a scrap at the end.) Then cut three 1.5 inch strips, two 1.25 inch strips and one 1 inch strip of felt. In the contrasting color (here, the green), cut a 2 inch diameter circle and a 1.25 inch square. Cut a small indent into the square.
Finally, cut a 2 inch diameter circle from your cardboard.
Credit: Megan Reardon
Now cut your flower color strips into 1.5, 1.25 and 1 inch squares respectively. If you need more petals you can use the bit of leftover felt to cut more squares. I ended up needing fifteen 1.5 inch petals, thirteen 1.25 inch petals and nine 1 inch petals, you might find you need more or fewer to fill in the flower. To form the petals cut each square into a rounded petal shape, with a wide base and a pointed tip as shown above. Put dots of glue in the lower corners and fold each side over so that they meet in the middle.
Credit:: Megan Reardon
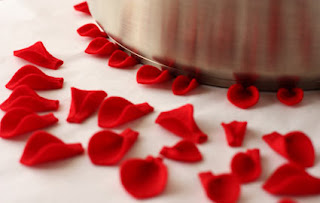
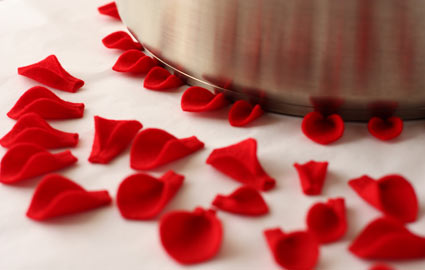
This is the most frustrating part of the project -- the glue can take a while to set and if you don't hold the petal shapes in place they will pop open. I found this to be true for both the wool felt and the polyester felt I tested. I made a few versions using felt from various sources and found the higher quality wool felt to be a bit thicker, which meant that it took longer to set, but the colors were richer so I was willing to wait. I used a heavy stainless steel skillet to hold my folded petals down while they dried, as shown above. Luckily, the Fabri-tac adhesive won't bond to the metal of the skillet, so you don't have to worry about petals stuck to your pan.
Credit: Megan Reardon
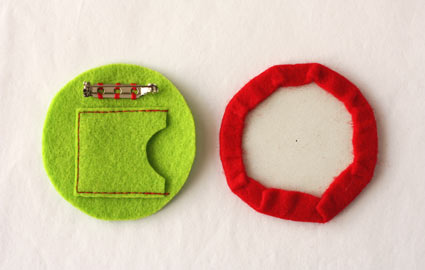
While the petals are setting you can prepare the back of the flower. Glue the cardboard circle to the center of the 3.25 inch flower color felt circle. Then dab glue on the overhanging part of the felt and fold it over the edges of the cardboard, wrapping it around to the back. You might need to put a saucepan on top to weigh it down while it sets. This will be the base for the petals, and the folded edges on the back will be covered by your contrasting felt circle at the very end.
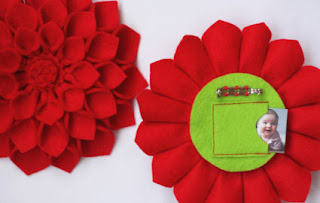
Now grab your contrasting felt square and circle. Position the square at the bottom of the circle and stitch it around three sides to make a small pocket that opens to the side, leaving enough room at the top of the circle to attach the pin. You can put a few small dabs of glue on the pin before you hand stitch it into place at the top of the circle. I used contrasting thread that matched my flower, but you can use whatever thread color you'd like.
Credit: Megan Reardon
When the petals are set, it's time to glue them to the flower color base. Glue the 1.5 inch petals around the edge of the base, positioning them in about 1/4 inch. As you work be sure to snug the base of the petals as close together side by side as you can; the more you can fit on the base, the more dramatic the results. Next, glue a row of the 1.25 inch petals about 1/4 inch further in towards the center of your pin. Do the same with the 1 inch petals, leaving about a 1 inch circle in the middle.
Credit: Megan Reardon
To finish the center of the flower cut a 1 inch circle from the remaining flower color felt using the pinking sheers, or cut a wavy edge with scissors. Also use the pinking sheers to cut a thin strip from the felt; you can cut two strips if you think you'll need them. Glue down the small circle in the center of your flower to cover the ends of the smallest petals. Then curl the thin strip into a tight spiral and glue that to the very center.
Credit: Megan Reardon
All that is left to do is to glue the contrasting colored backing to the back of the flower, covering the back of the cardboard, and find a picture -- or write a little note -- small enough to slip into the secret pocket. Then wrap it up and present it to Mom!
Credit: Megan Reardon
Crafty genius Megan Reardon lives in Seattle with her husband Scott and a clover plant, which she might have killed last week. You can find more of her DIY projects at her blog, Not Martha. She contributed this craft to Holidash via Seed.
This Mother's Day, make something beautiful for Mom. Credit: Megan Reardon
Wondering about what to make Mom for Mother's Day? I've been thinking about traditional gifts like flower corsages and lockets, and I decided to combine the two. This felt dahlia pin has a secret pocket in the back that can hold a picture or message for your favorite mom.
You'll need:
- scissors
- Fabri-tac adhesive
- two sheets craft felt, one for the flower and one in a contrasting color for the back
- needle and thread
- brooch pin (available in the beading section of craft stores)
- a bit of thin cardboard (a cereal box from your recycling bin will be perfect for this)
Credit: Megan Reardon
Also helpful, if you have them:
- pinking sheers
- a rotary cutter, mat and ruler
- a sewing machine
Credit: Megan Reardon
We'll be cutting out a bunch individual petals, and above I show what I think is the most efficient way to divide up your sheet of felt. First cut a 3.25 inch diameter circle from your flower color felt. (Do this first to make sure you don't leave yourself too small a scrap at the end.) Then cut three 1.5 inch strips, two 1.25 inch strips and one 1 inch strip of felt. In the contrasting color (here, the green), cut a 2 inch diameter circle and a 1.25 inch square. Cut a small indent into the square.
Finally, cut a 2 inch diameter circle from your cardboard.
Credit: Megan Reardon
Now cut your flower color strips into 1.5, 1.25 and 1 inch squares respectively. If you need more petals you can use the bit of leftover felt to cut more squares. I ended up needing fifteen 1.5 inch petals, thirteen 1.25 inch petals and nine 1 inch petals, you might find you need more or fewer to fill in the flower. To form the petals cut each square into a rounded petal shape, with a wide base and a pointed tip as shown above. Put dots of glue in the lower corners and fold each side over so that they meet in the middle.
Credit:: Megan Reardon
This is the most frustrating part of the project -- the glue can take a while to set and if you don't hold the petal shapes in place they will pop open. I found this to be true for both the wool felt and the polyester felt I tested. I made a few versions using felt from various sources and found the higher quality wool felt to be a bit thicker, which meant that it took longer to set, but the colors were richer so I was willing to wait. I used a heavy stainless steel skillet to hold my folded petals down while they dried, as shown above. Luckily, the Fabri-tac adhesive won't bond to the metal of the skillet, so you don't have to worry about petals stuck to your pan.
Credit: Megan Reardon
While the petals are setting you can prepare the back of the flower. Glue the cardboard circle to the center of the 3.25 inch flower color felt circle. Then dab glue on the overhanging part of the felt and fold it over the edges of the cardboard, wrapping it around to the back. You might need to put a saucepan on top to weigh it down while it sets. This will be the base for the petals, and the folded edges on the back will be covered by your contrasting felt circle at the very end.
Now grab your contrasting felt square and circle. Position the square at the bottom of the circle and stitch it around three sides to make a small pocket that opens to the side, leaving enough room at the top of the circle to attach the pin. You can put a few small dabs of glue on the pin before you hand stitch it into place at the top of the circle. I used contrasting thread that matched my flower, but you can use whatever thread color you'd like.
Credit: Megan Reardon
When the petals are set, it's time to glue them to the flower color base. Glue the 1.5 inch petals around the edge of the base, positioning them in about 1/4 inch. As you work be sure to snug the base of the petals as close together side by side as you can; the more you can fit on the base, the more dramatic the results. Next, glue a row of the 1.25 inch petals about 1/4 inch further in towards the center of your pin. Do the same with the 1 inch petals, leaving about a 1 inch circle in the middle.
Credit: Megan Reardon
To finish the center of the flower cut a 1 inch circle from the remaining flower color felt using the pinking sheers, or cut a wavy edge with scissors. Also use the pinking sheers to cut a thin strip from the felt; you can cut two strips if you think you'll need them. Glue down the small circle in the center of your flower to cover the ends of the smallest petals. Then curl the thin strip into a tight spiral and glue that to the very center.
Credit: Megan Reardon
All that is left to do is to glue the contrasting colored backing to the back of the flower, covering the back of the cardboard, and find a picture -- or write a little note -- small enough to slip into the secret pocket. Then wrap it up and present it to Mom!
Credit: Megan Reardon
Crafty genius Megan Reardon lives in Seattle with her husband Scott and a clover plant, which she might have killed last week. You can find more of her DIY projects at her blog, Not Martha. She contributed this craft to Holidash via Seed.


 This Mother's Day, make something beautiful for Mom. Credit: Megan Reardon
Wondering about what to make Mom for Mother's Day? I've been thinking about traditional gifts like flower corsages and lockets, and I decided to combine the two. This felt dahlia pin has a secret pocket in the back that can hold a picture or message for your favorite mom.
You'll need:
- scissors
- Fabri-tac adhesive
- two sheets craft felt, one for the flower and one in a contrasting color for the back
- needle and thread
- brooch pin (available in the beading section of craft stores)
- a bit of thin cardboard (a cereal box from your recycling bin will be perfect for this)
Credit: Megan Reardon
Also helpful, if you have them:
- pinking sheers
- a rotary cutter, mat and ruler
- a sewing machine
Credit: Megan Reardon
We'll be cutting out a bunch individual petals, and above I show what I think is the most efficient way to divide up your sheet of felt. First cut a 3.25 inch diameter circle from your flower color felt. (Do this first to make sure you don't leave yourself too small a scrap at the end.) Then cut three 1.5 inch strips, two 1.25 inch strips and one 1 inch strip of felt. In the contrasting color (here, the green), cut a 2 inch diameter circle and a 1.25 inch square. Cut a small indent into the square.
Finally, cut a 2 inch diameter circle from your cardboard.
Credit: Megan Reardon
Now cut your flower color strips into 1.5, 1.25 and 1 inch squares respectively. If you need more petals you can use the bit of leftover felt to cut more squares. I ended up needing fifteen 1.5 inch petals, thirteen 1.25 inch petals and nine 1 inch petals, you might find you need more or fewer to fill in the flower. To form the petals cut each square into a rounded petal shape, with a wide base and a pointed tip as shown above. Put dots of glue in the lower corners and fold each side over so that they meet in the middle.
Credit:: Megan Reardon
This is the most frustrating part of the project -- the glue can take a while to set and if you don't hold the petal shapes in place they will pop open. I found this to be true for both the wool felt and the polyester felt I tested. I made a few versions using felt from various sources and found the higher quality wool felt to be a bit thicker, which meant that it took longer to set, but the colors were richer so I was willing to wait. I used a heavy stainless steel skillet to hold my folded petals down while they dried, as shown above. Luckily, the Fabri-tac adhesive won't bond to the metal of the skillet, so you don't have to worry about petals stuck to your pan.
Credit: Megan Reardon
While the petals are setting you can prepare the back of the flower. Glue the cardboard circle to the center of the 3.25 inch flower color felt circle. Then dab glue on the overhanging part of the felt and fold it over the edges of the cardboard, wrapping it around to the back. You might need to put a saucepan on top to weigh it down while it sets. This will be the base for the petals, and the folded edges on the back will be covered by your contrasting felt circle at the very end.
Now grab your contrasting felt square and circle. Position the square at the bottom of the circle and stitch it around three sides to make a small pocket that opens to the side, leaving enough room at the top of the circle to attach the pin. You can put a few small dabs of glue on the pin before you hand stitch it into place at the top of the circle. I used contrasting thread that matched my flower, but you can use whatever thread color you'd like.
Credit: Megan Reardon
When the petals are set, it's time to glue them to the flower color base. Glue the 1.5 inch petals around the edge of the base, positioning them in about 1/4 inch. As you work be sure to snug the base of the petals as close together side by side as you can; the more you can fit on the base, the more dramatic the results. Next, glue a row of the 1.25 inch petals about 1/4 inch further in towards the center of your pin. Do the same with the 1 inch petals, leaving about a 1 inch circle in the middle.
Credit: Megan Reardon
To finish the center of the flower cut a 1 inch circle from the remaining flower color felt using the pinking sheers, or cut a wavy edge with scissors. Also use the pinking sheers to cut a thin strip from the felt; you can cut two strips if you think you'll need them. Glue down the small circle in the center of your flower to cover the ends of the smallest petals. Then curl the thin strip into a tight spiral and glue that to the very center.
Credit: Megan Reardon
All that is left to do is to glue the contrasting colored backing to the back of the flower, covering the back of the cardboard, and find a picture -- or write a little note -- small enough to slip into the secret pocket. Then wrap it up and present it to Mom!
Credit: Megan Reardon
Crafty genius Megan Reardon lives in Seattle with her husband Scott and a clover plant, which she might have killed last week. You can find more of her DIY projects at her blog, Not Martha. She contributed this craft to Holidash via Seed.
This Mother's Day, make something beautiful for Mom. Credit: Megan Reardon
Wondering about what to make Mom for Mother's Day? I've been thinking about traditional gifts like flower corsages and lockets, and I decided to combine the two. This felt dahlia pin has a secret pocket in the back that can hold a picture or message for your favorite mom.
You'll need:
- scissors
- Fabri-tac adhesive
- two sheets craft felt, one for the flower and one in a contrasting color for the back
- needle and thread
- brooch pin (available in the beading section of craft stores)
- a bit of thin cardboard (a cereal box from your recycling bin will be perfect for this)
Credit: Megan Reardon
Also helpful, if you have them:
- pinking sheers
- a rotary cutter, mat and ruler
- a sewing machine
Credit: Megan Reardon
We'll be cutting out a bunch individual petals, and above I show what I think is the most efficient way to divide up your sheet of felt. First cut a 3.25 inch diameter circle from your flower color felt. (Do this first to make sure you don't leave yourself too small a scrap at the end.) Then cut three 1.5 inch strips, two 1.25 inch strips and one 1 inch strip of felt. In the contrasting color (here, the green), cut a 2 inch diameter circle and a 1.25 inch square. Cut a small indent into the square.
Finally, cut a 2 inch diameter circle from your cardboard.
Credit: Megan Reardon
Now cut your flower color strips into 1.5, 1.25 and 1 inch squares respectively. If you need more petals you can use the bit of leftover felt to cut more squares. I ended up needing fifteen 1.5 inch petals, thirteen 1.25 inch petals and nine 1 inch petals, you might find you need more or fewer to fill in the flower. To form the petals cut each square into a rounded petal shape, with a wide base and a pointed tip as shown above. Put dots of glue in the lower corners and fold each side over so that they meet in the middle.
Credit:: Megan Reardon
This is the most frustrating part of the project -- the glue can take a while to set and if you don't hold the petal shapes in place they will pop open. I found this to be true for both the wool felt and the polyester felt I tested. I made a few versions using felt from various sources and found the higher quality wool felt to be a bit thicker, which meant that it took longer to set, but the colors were richer so I was willing to wait. I used a heavy stainless steel skillet to hold my folded petals down while they dried, as shown above. Luckily, the Fabri-tac adhesive won't bond to the metal of the skillet, so you don't have to worry about petals stuck to your pan.
Credit: Megan Reardon
While the petals are setting you can prepare the back of the flower. Glue the cardboard circle to the center of the 3.25 inch flower color felt circle. Then dab glue on the overhanging part of the felt and fold it over the edges of the cardboard, wrapping it around to the back. You might need to put a saucepan on top to weigh it down while it sets. This will be the base for the petals, and the folded edges on the back will be covered by your contrasting felt circle at the very end.
Now grab your contrasting felt square and circle. Position the square at the bottom of the circle and stitch it around three sides to make a small pocket that opens to the side, leaving enough room at the top of the circle to attach the pin. You can put a few small dabs of glue on the pin before you hand stitch it into place at the top of the circle. I used contrasting thread that matched my flower, but you can use whatever thread color you'd like.
Credit: Megan Reardon
When the petals are set, it's time to glue them to the flower color base. Glue the 1.5 inch petals around the edge of the base, positioning them in about 1/4 inch. As you work be sure to snug the base of the petals as close together side by side as you can; the more you can fit on the base, the more dramatic the results. Next, glue a row of the 1.25 inch petals about 1/4 inch further in towards the center of your pin. Do the same with the 1 inch petals, leaving about a 1 inch circle in the middle.
Credit: Megan Reardon
To finish the center of the flower cut a 1 inch circle from the remaining flower color felt using the pinking sheers, or cut a wavy edge with scissors. Also use the pinking sheers to cut a thin strip from the felt; you can cut two strips if you think you'll need them. Glue down the small circle in the center of your flower to cover the ends of the smallest petals. Then curl the thin strip into a tight spiral and glue that to the very center.
Credit: Megan Reardon
All that is left to do is to glue the contrasting colored backing to the back of the flower, covering the back of the cardboard, and find a picture -- or write a little note -- small enough to slip into the secret pocket. Then wrap it up and present it to Mom!
Credit: Megan Reardon
Crafty genius Megan Reardon lives in Seattle with her husband Scott and a clover plant, which she might have killed last week. You can find more of her DIY projects at her blog, Not Martha. She contributed this craft to Holidash via Seed.


Saturday, March 2, 2013


Subscribe to:
Posts (Atom)