DNAFusion Won’t Start after Account Password Change

So you’ve noticed that the installer who set up DNA Fusion for your site decided to leave the application set up with a local account that doesn’t have a password.
Being the security conscious individual you are, the password is changed. All seems fine until the next time DNAFusion is run, at which time you’re greeted with an error message.

The Event Logs will show entries like this:

DCOM got error “1326” and was unable to logon YOURMACHINE\InstallerUsername in order to run the server: { some GUID here }

The solution is two parts, changing the logon account details for the DNADrv32 service, and changing the logon account details for the DCOM component.

First, in services look for DNADrv32. In Properties, choose the Log On tab and set the user local user account and matching password.

Next, navigate to the Control Panel, Administrative Tools, then Component Services. Here, expand Component Services, Computers, My Computer, COM+ Applications. Find NPowerDNA in the list, then choose Properties. On the Identity tab, update the user details to match.

Finally, start the NPowerDNA component, then try launching DNAFusion. If all goes well, it should present the usual login screen.

NVidia MODS MATS Root Partition Not Found

So you’d like to test your broken GPU with Nvidia’s Modular Diagnostic Software ( MODS ) or the memory testing suite ( MATS ).

After trawling through random websites with links to some Russian language download sites or a random users online web storage, then using a program to make a USB device bootable and dump the files or write the complete image, finally the first attempt to boot can be made. Unfortunately, the show is over before it even begins – dumped to a limited boot command line after an error “Root Partition Not Found”. Trying different bootloaders or filesystem formats makes no difference. Trying other software or sources still don’t allow the tiny customized Linux image to load.

The problem is the flash drive – or how it identifies itself, specifically. The solution is to use an older plain flash drive that doesn’t have any of the once popular UDISK features. Sometimes USB 3.0 devices will have the same problem, or other adapters for flash memory. I’ve had good luck with simple old and small USB 2.0 flash drives.

Thanks for reading! If this helped ( or didn’t ) let me know with a comment.

Non Responsive Sections Ghost or Phantom Touch after Digitizer Replacement

If you replace the screen and digitizer on your Microsoft Surface Pro, HP Spectre x360 etc. and suddenly have the problem of ghost or phantom touches ( random or persistent touch interaction that you the user didn’t perform ) or areas of the digitizer that don’t respond to touch at all, don’t panic!

Your touch controller might just need to be recalibrated.

Sometimes this can be done with a utility, other times as part of a firmware update. Microsoft used to provide a link to such a utility for Surface devices with the nTrig controller, but then removed it.
Fortunately for us, Sony also used an nTrig controller and still has the download available here: https://www.sony.com/electronics/support/downloads/W0009338

Simply allow the tool to extract to a folder of your choosing, then run CalibG4.exe and wait for it to finish. Once complete, the touch feature should work like new.

For the HP Spectre x360 13 and 15 I won’t provide a link. Why? It could brick your touch controller if the wrong firmware is flashed.
There are several variants based on which specific generation device you own and what resolution touch panel your device shipped with ( HD, FHD, QHD ). The easiest way to get the correct firmware for your convertible is to visit HP’s support website and let them detect your device here: https://support.hp.com/us-en/product/detect

Next, choose the Drivers and Software section, then Firmware, then the latest ( usually 2016 or 2017 ) touch firmware that matches your devices resolution. Run the installer, let it extract and run though the firmware update, and just like that the touch feature should be back to normal.

Unitrends Backup, FreeNAS, and VMWare iSCSI

In the process of upgrading from existing physical servers to an (almost) fully virtualized environment, a new backup system was required.

The existing backup system is USB, utilizing 1TB Tandberg RDX QuikStor cartridges managed by Backup Exec on one of the physical servers running Server 2008 R2.

Backups are run nightly, with one cartridge weekly taken off site.

There were two physical servers, Microsoft Exchange, and the Active Directory Domain Controller / Fileserver.

The new system has one physical Server 2016 domain controller, two VMWare ESXi hosts, an HP SAN, a virtual Server 2016 domain controller, the virtual Microsoft Exchange server, and a virtual MX integration box that emails voicemail from the VOIP system (was moved p2v, previously not backed up).

The goal is to produce scheduled daily backups in the rack on storage separate from the SAN, then replicate the backup offsite to another datacenter that houses the public side servers over a 100Mbit fiber WAN link.

Unitrends backup solution seemed ideal for this, I had used the free version for testing and found that the backup fit within the 1TB storage limitation quite easily.

The FreeNAS box is an HP server with 20GB of RAM, two 8-core Intel Xeon processors, a 4-port 1Gbit Broadcom card, the integrated HP P410i SAS RAID controller, and 4 600GB 10k SAS drives.

The HP P410i does not support HBA mode or passthrough, so we must configure the RAID volumes using the HP Array Configuration Utility (provided on the bootable HP Smart Start ISO) rather than creating software RAID with FreeNAS.

The configuration for testing was RAID 1+0, which produced a 1.2TB volume with very good write and read speeds – while this was fine for the free version, I did need the extra capacity that only RAID 5 could provide. Initially I encountered very slow write performance, a paltry 10MB per second. This was suspiciously close to the maximum throughput for a 100Mbit network link, so I suspected that something was wrong with my network configuration.

My initial configuration for the FreeNAS box was using the Link Aggregation Protocol to group three 1Gbit ports on the box and switch, however as I discovered this is not supported for iSCSI. Link aggregation was only providing the bandwidth of a single 1Gbit link, but unfortunately was not the cause for the slow writes.

I discovered that the controller cache was incorrectly allocated only to reads by default in the ACU, which amplified the already terrible write penalty for RAID 5 in spite of having the drive cache and every other option enabled.

The solution to make the best use of the multiple network links is iSCSI MPIO, for VMWare ESXi and FreeNAS this can be accomplished by configuring each port on the FreeNAS box with it’s own subnet (example 172.16.1.x, 172.16.2.x, 172.16.3.x, all /24) and assigning them each to the iSCSI portal.

On the VMWare side, a matching VMKernel adapter for each subnet on each host is required, bound to their own physical Ethernet ports. Once complete, bind the new network ports to the iSCSI adapter, add the target IP addresses for the portal and rescan, then set the multipathing policy for the device to Round Robin.

All of these network and cache configuration changes were made with the Unitrends VM shut down without negatively affecting the Unitrends Backup storage volume. Once everything was powered back up a quick 2GB test backup succeeded in writing 30MB / second using approximately 150Mbit /second each on two of the 1Gbit Ethernet ports. A rather dramatic improvement.
Windows 10 Stuck at Boot Animation with No Disk Activity

The situation: Your computer was working just fine the last time you shut it down and now it won’t complete the boot process. The Windows logo and boot animation start, and there is a quick bit of disk activity which quickly stops.  The dots spin round and round, but nothing more happens. Turning it off and on causes automatic recovery to start, but it too has the same problem.

What happened: This is a problem caused by something with HiberFile.sys. This file is created for Fast Boot or hibernation.  Fast Boot and hibernation are turned off in Power Options on my PC, so it may also be the Hybrid Sleep setting.

The fix: Use a boot CD/USB etc. of some kind to get access to the Windows drive and recovery drive (they’ll probably both be in this state).  You’ll need to use NTFSFix in some versions of Linux before it will let you mount the drives.  After this, delete HiberFile.sys from the Windows drive.

If all goes well, your PC should start right up.  Once started if you don’t use sleep or hibernation turn fast boot, hibernation, and hybrid sleep off in power options.

Windows 7 to Windows 10 Upgrade Fails with error code 0x8000000A, 0x50011 [SOLVED]

When upgrading to Windows 10 from Windows 7, the installer collects information about the drivers that are currently installed using DISM.

If DISM is unable to run, the installation will fail with this error code. There will also be lines similar to the following in C:\$Windows.~bt\Sources\Panther\SetupAct.log

YYY-MM-DD HH:MM:SS, Error   CONX   Failed to open dism driver store 0x8000000a
YYY-MM-DD HH:MM:SS, Error   CONX   Failed to collect driver information 0x8000000a
YYY-MM-DD HH:MM:SS, Error   CONX   Unable to initialize Device Driver Map with 0x8000000a

You can verify if DISM is functioning and providing driver information (or not) by running the following command from an elevated command prompt:

Dism /Online /Get-Drivers

If DISM is encountering the same problem as described on this page, the result will be this error message:

Error: 3
The directory c:\windows does not appear to be a valid Windows directory.
Ensure that the /WinDir option that is specified is valid. For more information, refer to the help by running DISM.exe /WinDir /?.

Lines similar to the following will also be present in C:\Windows\Logs\DISM\DISM.log

YYYY-MM-DD HH:MM:SS, Info DISM DISM OS Provider: PID=XXXX Setting Windows folder to C:\Windows – CDISMOSServiceManager::SetWindowsDirectory
YYYY-MM-DD HH:MM:SS, Info CSI 00000001 Shim considered [l:260{130}]”\??\C:\Windows\Servicing\amd64_microsoft-windows-servicingstack_31bf3856ad364e35_10.0.10240.16439_none_11614ea761f64ffd\pkgmgr.exe” : got STATUS_OBJECT_PATH_NOT_FOUND
YYYY-MM-DD HH:MM:SS, Info CSI 00000002 Shim considered [l:254{127}]”\??\C:\Windows\WinSxS\amd64_microsoft-windows-servicingstack_31bf3856ad364e35_10.0.10240.16439_none_11614ea761f64ffd\pkgmgr.exe” : got STATUS_OBJECT_NAME_NOT_FOUND
YYYY-MM-DD HH:MM:SS, Info CSI 00000003 Shim considered [l:116{58}]”\??\C:\Windows\Servicing\10.0.10240.16439_amd64\pkgmgr.exe” : got STATUS_OBJECT_PATH_NOT_FOUND
YYYY-MM-DD HH:MM:SS, Info CSI 00000004 Shim considered [l:110{55}]”\??\C:\Windows\WinSxS\10.0.10240.16439_amd64\pkgmgr.exe” : got STATUS_OBJECT_PATH_NOT_FOUND
YYYY-MM-DD HH:MM:SS, Error CSI 00000005 (F) HRESULT_FROM_WIN32(ERROR_PATH_NOT_FOUND) #1# from SssBindServicingStackParams={cb=00000040, flags=00000000} Cookie=(inner-null), Disp=1[gle=0x80070003]
YYYY-MM-DD HH:MM:SS, Error CSI 00000006@YYYY/MM/DD:HH:MM:SS.FFF (F) d:\w7rtm\base\wcp\shim\binder.cpp(615): Error HRESULT_FROM_WIN32(ERROR_PATH_NOT_FOUND) originated in function SssBindServicingStack expression: (pInputParameters->dwFlags & (0x00000020))
[gle=0x80004005]
YYYY-MM-DD HH:MM:SS, Warning DISM DISM OS Provider: PID=XXXX Failed to bind the online servicing stack – CDISMOSServiceManager::get_ServicingStackDirectory(hr:0x80070003)
YYYY-MM-DD HH:MM:SS, Error DISM DISM OS Provider: PID=XXXX Unable to retrieve servicing stack folder for DLL search path modification. – CDISMOSServiceManager::SetDllSearchPath(hr:0x80070003)
YYYY-MM-DD HH:MM:SS, Error DISM DISM OS Provider: PID=XXXX Unable to set the DLL search path to the servicing stack folder. C:\Windows may not point to a valid Windows folder. – CDISMOSServiceManager::SetWindowsDirectory(hr:0x80070003)
YYYY-MM-DD HH:MM:SS, Error DISM DISM.EXE: Failed to set the windows directory to ‘C:\Windows’. HRESULT=80070003

The solution in this case is to remove the errant servicing version folder (10.0.10240.16439) from C:\Windows\Servicing\Version\

I would recommend moving the folder to your Desktop, and then verifying that DISM functions as expected by running DISM /Online /Get-Drivers again.

[SOLVED] Cannot Print to Epson Receipt Printer on Ethernet Network TM-T20II Status Not Available

Problem Description

After installing the printer using the Epson Advanced Print Driver (v5) then attempting to print the test page you may receive the notification ‘Epson TM-T20II Receipt is not available for printing’ followed by a message indicating that the test page could not be printed.  In Devices and Printers, the Epson Receipt printer shows Status: not available when selected or hovered over and the title bar displays Not Available when viewing the print queue.

Solution

The Epson APD v5 assumes that your computer has full two way communication with the printer. This is not always correct.

If your printer is on a separate network or is behind a networking device that blocks certain types of network traffic (sometimes a wireless access point or router), you may need to disable bidirectional communication and SNMP monitoring.

First, remove the existing device from Devices and Printers and restart your computer.

Next, start the ‘Add a Printer’ Wizard in Devices and Printers. Choose ‘The Printer I Want Isn’t Listed’, then select the ‘Add a printer using a TCP/IP address or hostname’ and click Next.

Choose TCP/IP Device from the Device Type drop down list, then enter the IP address of your printer and click Next. If you don’t know the address, press and hold the pin-hole button on the Ethernet module on the back of the printer for 3 seconds to print the printer network configuration.

In the list of printer drivers, choose EPSON in the Manufacturer column, then select the Epson TM-T20II Receipt5 driver in the Printers column and click Next. If the driver is already installed, choose Use the driver that is currently installed. Click Next, then choose a name for the printer, click Next again. Do not print a test page.

In Devices and Printers, right click on the Epson TM-T20II Receipt printer that was just created and choose Printer Properties.

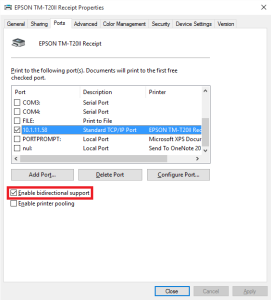
screenshot disable bidirectional support

Uncheck ‘Enable bidirectional support’.

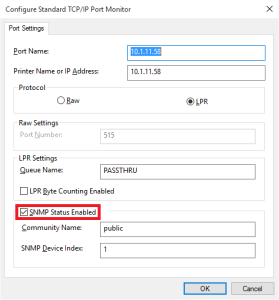
Click the Configure Port button.

screenshot disable snmp status

Uncheck SNMP Status Enabled, then click OK.

Click Apply, then OK. Printer status should now display ‘0 document(s) in queue’.  If not, reboot your computer and check again.

Test pages (and receipts) should now print.

[SOLVED] Windows Setup could not configure Windows on this computer’s hardware – Windows Vista to Windows 7 Upgrade

Problem Description
When performing an upgrade installation of Windows 7 or Windows Vista you may receive this error message during the hardware detection phase of setup if the following is true:
1. Your system has an Intel storage controller (ICH) configured to RAID or AHCI mode in teh BIOS.
2. Your hard drive is an Advanced Format 4K sector / 512byte emulated disk.
Something similar to the following line appears in C:\Windows.~bt\Sources\Panther\setuperr.log
“Error [0x060435] IBS Callback_Specialize: An error occurred while either deciding if we need to specialize or while specializing; dwRet = 0x4b8”
Something similar to the following line appears in C:\Windows.~bt\Sources\Panther\setupact.log
“Info SYSPRP SPPNP: iaStorV is the function driver for device PCI\VEN_8086&DEV_ … “
Solution
There are two possible solutions, one is to integrate the latest version of the Intel Rapid Storage Technology driver for your Intel storage controller into the Windows 7 installation source.
I will not cover this solution in detail, but one would use the Windows Automated Installation Kit.
More information about the WAIK for Windows 7
Installing drivers offline using DISM
Download the Windows 7 WAIK
Intel Rapid Storage Technology Driver
The second solution (which I believe to be simpler) is to temporarily switch the storage controller into IDE/Legacy mode in the BIOS before the upgrade.
To do this the correct services must be enabled to allow Windows to use the IDE mode drivers.
Run regedit and navigate to HKLM\System\CurrentControlSet\Services\intelide
Change the data for the ‘start’ value from 3 to 0.
Repeat this step for HKLM\System\CurrentControlSet\Services\pciide and HKLM\System\CurrentControlSet\Services\Atapi
Reboot your PC and enter the BIOS setup menu.
Look for a SATA, Storage, Advanced or Integrated Peripherals configuration section. This option may be on the main menu as well.
There should be an option such as SATA Configuration, SATA Mode, On-Chip SATA, etc. that lists IDE/Legacy, AHCI, and RAID
Save changes and exit, Windows should boot. If it fails to boot with a STOP 7B error you may not be using an Intel storage controller or did not properly enable the required services.
Attempt the upgrade again. Windows 7 should upgrade and transfer your data successfully.
After the upgrade has completed AHCI or RAID mode can be re-enabled by following the instructions here:
Error message occurs after you change the SATA mode of the boot drive
Run regedit and navigate to HKLM\System\CurrentControlSet\Services\msahci
Change the data for the ‘start’ value from 3 to 0.
Repeat this step for HKLM\System\CurrentControlSet\Services\iastor (if it exists) and HKLM\System\CurrentControlSet\Services\iastorVHKLM\System\CurrentControlSet\Services\iastorV

Some iSCSI Volumes/Devices not Visible from VMWare Host

Make sure the mappings and visibility are set properly in the storage management configuration utility for your SAN.

In my case, default mappings had been configured for some volumes and not others.

Explicit mappings for the remaining volumes had been created (by someone else) for two of the hosts but not the third new host that I had just installed.
This created an abundance of confusion, since the storage configuration was expected to be consistent.

Adding explicit mappings for this host did not solve the problem for some reason unknown to me, but reconfiguring the volumes with a default mapping did.

Nvidia or AMD Display Driver Code 43 Windows 10

Solution: Turn OFF UEFI mode in the BIOS.

!!!WARNING!!!
UEFI is REQUIRED for drives larger than 2TB!
If Windows 10 was installed with UEFI enabled it may not boot when the UEFI is disabled or Legacy Boot (CSM, etc) is enabled.

Make sure you have your installation media (DVD or USB) available, you will need to run startup repair to rebuild the boot configuration for Legacy mode.