Why Your Car Battery Sparks When Connecting the Negative Terminal

Have you ever noticed a small spark when connecting the negative terminal of your car battery? If so, don't worry—this is usually normal and can happen for several reasons. Let's explore why this occurs and how you can handle it safely.

Why Does the Negative Terminal Spark?

1. Current Flow to Electrical Systems: When you attach the negative terminal, it completes the circuit, allowing electricity to flow through the vehicle's electrical systems. This can cause a brief spark as various components, like capacitors, draw initial power.

2. Residual Charge: Sometimes, electrical components retain a bit of charge even after the battery is disconnected. Reconnecting the battery completes the circuit again, causing a small spark as power is restored.

3. Charging Capacitors: Modern cars have many electronic systems equipped with capacitors. These capacitors can cause a small spark as they charge up when you reconnect the battery.

How to Handle It Safely

While a small spark is generally nothing to worry about, here are some steps to ensure safety and minimize sparking:

1. Turn Everything Off: Before connecting the battery, make sure all electrical devices in the car, such as lights, radio, and air conditioning, are turned off. This reduces the chance of a spark.

2. Connect in the Right Order: When connecting the battery, always attach the positive terminal first and the negative terminal second. When disconnecting, remove the negative terminal first, then the positive. This sequence helps prevent short circuits.

3. Check for Damage: Inspect the battery terminals and cables for any signs of damage or corrosion. Clean the terminals if necessary to ensure a solid connection.

4. Wear Safety Gear: Always wear safety glasses and gloves when working with a car battery. This will protect you from potential sparks or acid spills.

When to Be Concerned

A small spark is normal, but if you see a large spark or notice other concerning signs like smoke, excessive heat, or damaged cables, it could indicate a more serious electrical issue. In such cases, it's best to have your car inspected by a professional mechanic.

By following these simple precautions, you can connect your car battery safely and minimize any risks associated with sparking. Remember, a small spark is usually nothing to worry about, but safety should always come first.

Why Your Car Battery Isn't Charging While Driving

As a responsible car owner, maintaining your vehicle's electrical system is crucial for smooth and uninterrupted driving experiences. One of the most critical components of this system is the battery, which powers everything from starting the engine to operating electronic accessories. However, if you've noticed that your car battery isn't charging while driving, it could indicate a potential issue that needs attention. In this article, we'll delve into the common reasons behind this problem and provide insights on how to address them.

Faulty Alternator: The alternator plays a pivotal role in charging your car's battery while the engine is running. If the alternator is malfunctioning or failing, it won't generate sufficient power to keep the battery charged. Signs of a faulty alternator include dimming headlights, dashboard warning lights, or a dead battery despite recent replacements.

Solution: Consult a professional mechanic to inspect the alternator and replace it if necessary. Regular alternator checks during routine maintenance can prevent unexpected breakdowns.

Loose or Corroded Battery Connections: Over time, the connections between the battery terminals and cables can become loose or corroded, hindering the flow of electricity. This impediment prevents the battery from receiving a proper charge, leading to potential starting issues or electrical failures.

Solution: Regularly inspect the battery terminals for corrosion or looseness. Clean any corrosion using a mixture of baking soda and water, and tighten the connections securely. Consider applying battery terminal grease to prevent future corrosion.

Faulty Battery: Even with a functional alternator, a faulty battery can still fail to hold a charge effectively. If your battery is old, damaged, or nearing the end of its lifespan, it may struggle to maintain sufficient voltage, especially under demanding driving conditions.

Solution: Have your battery tested by a professional to assess its health. If it's deemed faulty, replace it with a high-quality, compatible battery to ensure reliable performance.

Broken or Slipping Drive Belt: The alternator is typically driven by a belt connected to the engine's crankshaft. If this belt becomes damaged, worn, or slips out of place, the alternator won't receive the necessary power to charge the battery adequately.

Solution: Inspect the drive belt for signs of wear, cracks, or looseness. Replace the belt if it shows any signs of damage, and ensure it's properly tensioned to maintain optimal performance.

Electrical System Issues: Various electrical system components, such as fuses, voltage regulators, or wiring, can affect the charging process. A blown fuse, malfunctioning voltage regulator, or damaged wiring can disrupt the flow of electricity, impacting the alternator's ability to charge the battery.

Solution: Conduct a comprehensive inspection of the electrical system, including fuses, relays, and wiring connections. Replace any faulty components and repair damaged wiring to restore proper charging functionality.

A car battery not charging while driving can stem from various underlying issues within the vehicle's electrical system. By understanding these common causes and implementing timely solutions, you can ensure optimal performance and reliability from your vehicle's battery and charging system. Regular maintenance and proactive troubleshooting are key to preventing unexpected breakdowns and enjoying worry-free driving experiences. If you're unsure about diagnosing or addressing the problem yourself, don't hesitate to seek assistance from a qualified mechanic for professional guidance and assistance.
Textual description of firstImageUrl

Ford Ecosport Remote Key Battery Replacement

Changing the Remote Control Battery: A Step-by-Step Guide

Remote controls have become an indispensable part of modern life, seamlessly connecting us to our entertainment systems, garage doors, and more. However, when the battery in your remote control runs out, it can be a minor inconvenience if you don't know how to replace it. Here's a comprehensive guide on how to change the battery in your remote control, whether it features a folding key blade or not.

1. Safety First

Before you begin, it's essential to prioritize safety, both for yourself and the environment. Make sure to dispose of old batteries responsibly by seeking guidance from your local authority on recycling options. This simple step contributes to environmental sustainability and prevents hazardous waste from accumulating in landfills.

Remote Control With a Folding Key Blade:

1. Detach the Key Blade: Insert a screwdriver into the slot on the side of the remote control, pushing it toward the key blade to detach it carefully.


2. Separate the Halves: Using the screwdriver, twist it in the specified position to start separating the two halves of the remote control. Repeat this step until the halves come apart.


Note: Avoid Contact, exercise caution not to touch the battery contacts or the printed circuit board with the screwdriver to prevent damage.

3. Twist the screwdriver in the position shown to separate the two halves of the remote control.


4. Carefully remove the battery with the screwdriver.
5. Install a new battery (3V CR 2032) with the + facing downward.

6. Reattach the Key Blade: Place the key blade back into its slot on the remote control.

Remote Control Without a Folding Key Blade:

1. Remove the Cover: Press and hold the buttons on the edges of the remote control to release the cover. Once released, carefully remove the cover.

2. Detach the Key Blade: Remove the key blade from its slot, if applicable.

3. Separate the Halves: Use a flat-bladed screwdriver to twist it in the specified position, separating the two halves of the remote control.

4. Exercise Caution: Just like with the previous method, avoid touching the battery contacts or the printed circuit board with the screwdriver.

5. Replace the Battery: Using the screwdriver, carefully remove the old battery from its compartment.

6. Insert the New Battery: Install a fresh 3V CR 2032 battery into the compartment, ensuring correct orientation (+ facing downward).

7. Reassemble the Remote: Once the new battery is in place, reassemble the two halves of the remote control securely.

8. Reattach the Key Blade: If your remote control features a key blade, slot it back into place.

By following these step-by-step instructions, you can easily replace the battery in your remote control, ensuring uninterrupted functionality and convenience. Remember to handle both old and new batteries responsibly to contribute to a cleaner, safer environment.
Textual description of firstImageUrl

Grinding Noise When Shifting in All Gears

Have you ever experienced a grinding noise while shifting gears in your car? It's a frustrating problem that can leave you scratching your head. But fear not, as we delve into the issue, we'll shed some light on what might be causing it and how you can address it.

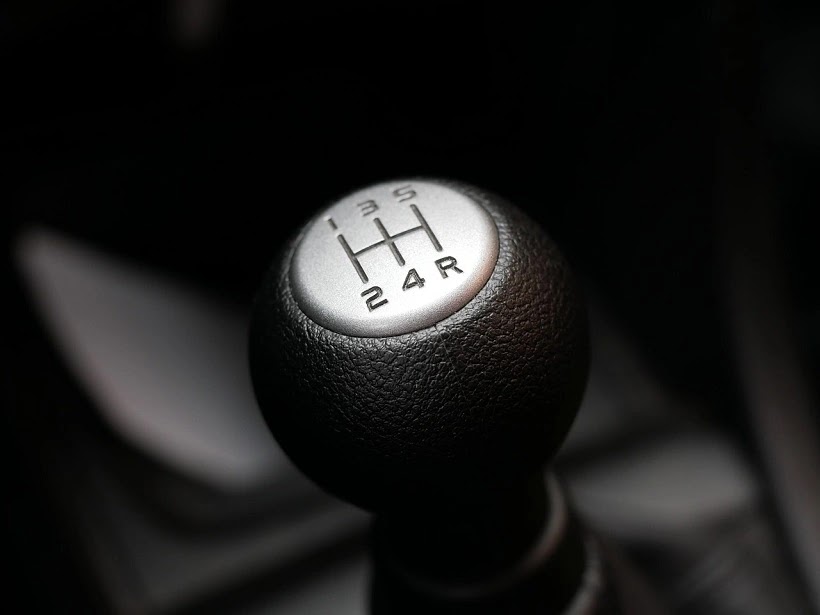
When you encounter grinding in all gears, it's a signal that something isn't quite right with your transmission system. But what could be the culprit behind this annoyance? The most probable cause, as many mechanics would suggest, is that your clutch isn't fully releasing.

What's Going On?
Let's break it down: When you shift gears, the clutch pedal is pressed, disengaging the engine from the transmission. This disconnection allows for smooth gear changes. However, if the clutch fails to release fully, the gears remain partially engaged, leading to that unpleasant grinding sensation.

What to Do?
Now, onto the solution. If your vehicle is still under warranty or a service contract, you're in luck – the repair costs should be covered. But if not, it's time to seek out a trusted mechanic, preferably one who specializes in manual transmissions. Ask them to inspect the clutch linkage. Often, a simple adjustment is all that's needed to rectify the issue and ensure the clutch releases properly.

Important Note:
It's essential to exercise caution, though. Don't rush into agreeing to a transmission teardown without seeking multiple opinions from different shops. This step can save you from unnecessary expenses and ensure that you're getting the best solution for your car troubles.

In conclusion, while a grinding noise when shifting gears can be alarming, it's often a symptom of a relatively straightforward problem: the clutch not releasing fully. By understanding the issue and taking the right steps to address it, you can get back to enjoying smooth and hassle-free drives in no time.
Textual description of firstImageUrl

Car's AC: Why It's Not Blowing Cold Air Anymore

Cartechhome Image
If you've noticed that your car's air conditioning isn't keeping things cool like it used to, you might be facing a common issue: a steady reduction in cold air over time. But fear not, understanding the cause and solution to this problem can save you from sweating it out during your daily commute.

Grinding Noise When Shifting Into Reverse Gear

Grinding noises while shifting into reverse gear can be an unsettling experience for any driver. One common culprit behind this issue is the incomplete release of the clutch, preventing smooth gear engagement. This article aims to shed light on the potential causes and offer a professional approach to remedy the problem.

Car Trouble Symptoms
Grinding noise when shifting into reverse gear

Car Troubleshooting
Understanding the Clutch Function
The clutch plays a crucial role in facilitating seamless gear changes by disconnecting the engine from the transmission. When the clutch fails to fully release or disengage upon depressing the clutch pedal, it leads to gears clashing and grinding noises, especially noticeable when shifting into reverse gear.

Likely Cause: Incomplete Clutch Release
While we cannot definitively pinpoint this as the sole cause, an incomplete clutch release is a highly probable factor contributing to grinding during gear shifts. It is essential to recognize that other issues may also lead to similar symptoms, and a thorough diagnosis by a qualified mechanic is crucial.

Remedying the Issue:
If your vehicle is still under warranty or a service contract, you may be covered for the necessary repairs. In such cases, it is advisable to contact your dealership or warranty provider to initiate the resolution process.

In the absence of warranty coverage, it is imperative to consult a reputable auto repair shop that specializes in manual transmissions. A skilled mechanic can perform a comprehensive inspection to identify the root cause of the incomplete clutch release.

Request the mechanic to specifically inspect the clutch linkage. In many instances, a simple adjustment to the clutch linkage can rectify the incomplete release problem, restoring smooth gear transitions. This targeted approach can potentially save on unnecessary repairs.

As a temporary workaround, drivers experiencing grinding issues may try a quick shift into first gear before engaging in reverse. While not a permanent solution, this method can sometimes mitigate the impact of an incomplete clutch release.

It is crucial to exercise caution and prudence when faced with the possibility of significant transmission repairs. Before agreeing to a transmission teardown or major overhaul, it is advisable to seek multiple opinions from different reputable shops. This ensures a comprehensive understanding of the issue and prevents unnecessary expenses.

Grinding noises during reverse gear shifts can be a symptom of an incomplete clutch release. Addressing this issue professionally involves consulting qualified mechanics, seeking warranty coverage if applicable, and considering targeted adjustments to the clutch linkage. By following these steps, drivers can navigate through the complexities of manual transmission issues with confidence and make informed decisions about the necessary repairs.
Textual description of firstImageUrl

Radiator - Boils Over When Engine is Only Semi-hot

A boiling radiator is a cause for concern and can be indicative of underlying issues within the engine cooling system. One common scenario is when the radiator boils over even when the engine is only semi-hot. In such cases, it often points to either a leaking radiator cap or an incorrect anti-freeze/water ratio. In this article, we will delve into the explanations behind these issues and provide practical remedies to address them.

Leaking Radiator Cap

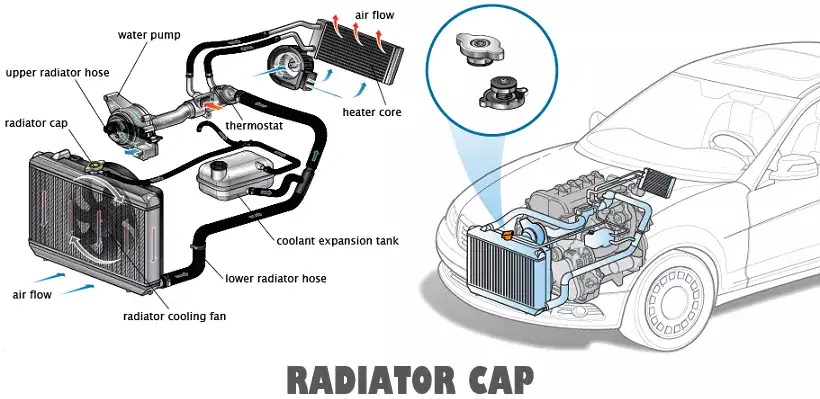
The radiator cap plays a crucial role in maintaining pressure within the engine cooling system. Its primary function is to increase the boiling point of the coolant, preventing premature boiling. However, if the radiator cap is leaking and fails to seal properly, the boiling point of the coolant drops significantly.
Cartechhome Image

Consequently, the engine and coolant may only be semi-hot, yet the radiator begins to boil over. To diagnose this issue, inspect the radiator cap when the engine is cold. Look for cracks in the rubber part on the cap's underside. Ensure a snug fit when screwing the cap back on, with no signs of looseness.

If any irregularities are observed, replacing the radiator cap might resolve the boil-over problem. A secure and properly functioning cap is essential to maintaining the required pressure in the cooling system.

Wrong Anti-freeze/Water Ratio

The anti-freeze/water ratio in the radiator is critical for both freezing and boil-over protection. Typically, a 50/50 mix of anti-freeze and water is sufficient for optimal performance. Anti-freeze not only prevents freezing in cold temperatures but also elevates the boiling point of water.

However, an incorrect ratio, such as insufficient anti-freeze and excessive water, can cause the coolant to boil at a lower temperature. This results in the radiator boiling over even when the engine is only semi-hot.

Remedy

Inspect and Replace the Radiator Cap:

Begin by examining the radiator cap when the engine is cold. If cracks or defects are identified, replace the cap with a new one. Ensure a tight seal to maintain the required pressure in the cooling system.

Adjust Anti-freeze/Water Ratio

If the radiator cap replacement does not resolve the issue, focus on the anti-freeze/water ratio. Drain the old coolant by backflushing the entire cooling system. Simply opening the radiator valve may not effectively remove all the old coolant. After flushing, refill the system with a proper 50/50 mixture of water and antifreeze.

A boiling radiator when the engine is only semi-hot can be attributed to a leaking radiator cap or an incorrect anti-freeze/water ratio. Regular inspection and maintenance are crucial to prevent these issues. By addressing these issues promptly and accurately, you can ensure the proper functioning of your engine cooling system, preventing overheating and potential damage to your vehicle.
Textual description of firstImageUrl

From a Stop, I Can't Shift Into First Gear/No Grinding

Cartechhome Image
Have you ever experienced the frustration of not being able to shift into first gear from a complete stop? Perhaps you've noticed that there is no grinding sound accompanying your failed attempts. This problem can be quite perplexing, but fear not! We're here to shed some light on the possible causes and remedies for this issue.