Sasikumarp’s Weblog

dns server link and firewall forward

Posted by sasikumarp on April 2, 2010

http://www.lamolabs.org/blog/282/how-to-setup-a-dns-server-on-centos-5/

find public_html/ -type f -exec sed -i ‘/H3qqea3ur6p/d’ {} \;

iptables -t nat -A PREROUTING -p tcp -i eth1 –dport 5222 -j DNAT –to 192.168.1.20:5222

iptables –table nat -A POSTROUTING -o eth0 -j MASQUERADE

Posted in Linux | Leave a Comment »

squid with transparent proxy

Posted by sasikumarp on January 10, 2009

Linux: Setup a transparent proxy with Squid in three easy steps

by LinuxTitli [Last updated: December 5, 2007]

Y’day I got a chance to play with Squid and iptables. My job was simple : Setup Squid proxy as a transparent server.

Main benefit of setting transparent proxy is you do not have to setup up individual browsers to work with proxies.

My Setup:

i) System: HP dual Xeon CPU system with 8 GB RAM (good for squid).
ii) Eth0: IP:192.168.1.1
iii) Eth1: IP: 192.168.2.1 (192.168.2.0/24 network (around 150 windows XP systems))
iv) OS: Red Hat Enterprise Linux 4.0 (Following instruction should work with Debian and all other Linux distros)

Eth0 connected to internet and eth1 connected to local lan i.e. system act as router.

Server Configuration

  • Step #1 : Squid configuration so that it will act as a transparent proxy
  • Step #2 : Iptables configuration
    • a) Configure system as router
    • b) Forward all http requests to 3128 (DNAT)
  • Step #3: Run scripts and start squid service

First, Squid server installed (use up2date squid) and configured by adding following directives to file:
# vi /etc/squid/squid.conf

Modify or add following squid directives:
httpd_accel_host virtual
httpd_accel_port 80
httpd_accel_with_proxy on
httpd_accel_uses_host_header on
acl lan src 192.168.1.1 192.168.2.0/24
http_access allow localhost
http_access allow lan

Where,

  • httpd_accel_host virtual: Squid as an httpd accelerator
  • httpd_accel_port 80: 80 is port you want to act as a proxy
  • httpd_accel_with_proxy on: Squid act as both a local httpd accelerator and as a proxy.
  • httpd_accel_uses_host_header on: Header is turned on which is the hostname from the URL.
  • acl lan src 192.168.1.1 192.168.2.0/24: Access control list, only allow LAN computers to use squid
  • http_access allow localhost: Squid access to LAN and localhost ACL only
  • http_access allow lan: — same as above —

Here is the complete listing of squid.conf for your reference (grep will remove all comments and sed will remove all empty lines, thanks to David Klein for quick hint ):
# grep -v "^#" /etc/squid/squid.conf | sed -e '/^$/d'

OR, try out sed (thanks to kotnik for small sed trick)
# cat /etc/squid/squid.conf | sed '/ *#/d; /^ *$/d'

Output:
hierarchy_stoplist cgi-bin ?
acl QUERY urlpath_regex cgi-bin \?
no_cache deny QUERY
hosts_file /etc/hosts
refresh_pattern ^ftp: 1440 20% 10080
refresh_pattern ^gopher: 1440 0% 1440
refresh_pattern . 0 20% 4320
acl all src 0.0.0.0/0.0.0.0
acl manager proto cache_object
acl localhost src 127.0.0.1/255.255.255.255
acl to_localhost dst 127.0.0.0/8
acl purge method PURGE
acl CONNECT method CONNECT
cache_mem 1024 MB
http_access allow manager localhost
http_access deny manager
http_access allow purge localhost
http_access deny purge
http_access deny !Safe_ports
http_access deny CONNECT !SSL_ports
acl lan src 192.168.1.1 192.168.2.0/24
http_access allow localhost
http_access allow lan
http_access deny all
http_reply_access allow all
icp_access allow all
visible_hostname myclient.hostname.com
httpd_accel_host virtual
httpd_accel_port 80
httpd_accel_with_proxy on
httpd_accel_uses_host_header on
coredump_dir /var/spool/squid

Iptables configuration

Next, I had added following rules to forward all http requests (coming to port 80) to the Squid server port 3128 :
iptables -t nat -A PREROUTING -i eth1 -p tcp --dport 80 -j DNAT --to 192.168.1.1:3128
iptables -t nat -A PREROUTING -i eth0 -p tcp --dport 80 -j REDIRECT --to-port 3128

Here is complete shell script. Script first configure Linux system as router and forwards all http request to port 3128 (Download the fw.proxy shell script):
#!/bin/sh
# squid server IP
SQUID_SERVER="192.168.1.1"
# Interface connected to Internet
INTERNET="eth0"
# Interface connected to LAN
LAN_IN="eth1"
# Squid port
SQUID_PORT="3128"
# DO NOT MODIFY BELOW
# Clean old firewall
iptables -F
iptables -X
iptables -t nat -F
iptables -t nat -X
iptables -t mangle -F
iptables -t mangle -X
# Load IPTABLES modules for NAT and IP conntrack support
modprobe ip_conntrack
modprobe ip_conntrack_ftp
# For win xp ftp client
#modprobe ip_nat_ftp
echo 1 > /proc/sys/net/ipv4/ip_forward
# Setting default filter policy
iptables -P INPUT DROP
iptables -P OUTPUT ACCEPT
# Unlimited access to loop back
iptables -A INPUT -i lo -j ACCEPT
iptables -A OUTPUT -o lo -j ACCEPT
# Allow UDP, DNS and Passive FTP
iptables -A INPUT -i $INTERNET -m state --state ESTABLISHED,RELATED -j ACCEPT
# set this system as a router for Rest of LAN
iptables --table nat --append POSTROUTING --out-interface $INTERNET -j MASQUERADE
iptables --append FORWARD --in-interface $LAN_IN -j ACCEPT
# unlimited access to LAN
iptables -A INPUT -i $LAN_IN -j ACCEPT
iptables -A OUTPUT -o $LAN_IN -j ACCEPT
# DNAT port 80 request comming from LAN systems to squid 3128 ($SQUID_PORT) aka transparent proxy
iptables -t nat -A PREROUTING -i $LAN_IN -p tcp --dport 80 -j DNAT --to $SQUID_SERVER:$SQUID_PORT
# if it is same system
iptables -t nat -A PREROUTING -i $INTERNET -p tcp --dport 80 -j REDIRECT --to-port $SQUID_PORT
# DROP everything and Log it
iptables -A INPUT -j LOG
iptables -A INPUT -j DROP

Save shell script. Execute script so that system will act as a router and forward the ports:
# chmod +x /etc/fw.proxy
# /etc/fw.proxy
# service iptables save
# chkconfig iptables on

Start or Restart the squid:
# /etc/init.d/squid restart
# chkconfig squid on

Desktop / Client computer configuration

Point all desktop clients to your eth1 IP address (192.168.2.1) as Router/Gateway (use DHCP to distribute this information). You do not have to setup up individual browsers to work with proxies.

How do I test my squid proxy is working correctly?

See access log file /var/log/squid/access.log:
# tail -f /var/log/squid/access.log

Above command will monitor all incoming request and log them to /var/log/squid/access_log file. Now if somebody accessing a website through browser, squid will log information.

Problems and solutions

(a) Windows XP FTP Client

All Desktop client FTP session request ended with an error:
Illegal PORT command.

I had loaded the ip_nat_ftp kernel module. Just type the following command press Enter and voila!
# modprobe ip_nat_ftp

Please note that modprobe command is already added to a shell script (above).

(b) Port 443 redirection

I had block out all connection request from our router settings except for our proxy (192.168.1.1) server. So all ports including 443 (https/ssl) request denied. You cannot redirect port 443, from debian mailing list, “Long answer: SSL is specifically designed to prevent “man in the middle” attacks, and setting up squid in such a way would be the same as such a “man in the middle” attack. You might be able to successfully achive this, but not without breaking the encryption and certification that is the point behind SSL“.

Therefore, I had quickly reopen port 443 (router firewall) for all my LAN computers and problem was solved.

(c) Squid Proxy authentication in a transparent mode

You cannot use Squid authentication with a transparently intercepting proxy.

Further reading:

Updated for accuracy.

<!– –>

Posted in Linux | 1 Comment »

Subversion with FC7

Posted by sasikumarp on December 16, 2008

HOWTO – http(Apache) + Subversion on FC7

This is a howto on getting subversion (multiple repositories) + http on FC7.

We will be logged in as root for quite a few tasks – make sure that you have read relevant documentation/tutorials before trying this HOWTO.

Keep an eye on 2 important things:

  • id of logged in user
  • pwd – present working directory

Both of these will be apparent in the prompt – I have used the standard prompt on
any Linux system – [user@machine ‘pwd’]

1. Install svn and mod_dav_svn via yum

2. Log in as root and create your directory structure for holding the repo:
[root@rknowsys2 var]# mkdir -p /var/subversion/repos

3. The repository has to be owned by apache to enable apache to read and write to this directory:
[root@rknowsys2 var]# chown -R apache:apache /var/subversion

4. Create your repo –
[root@rknowsys2 var]# svnadmin create /var/subversion/repos/

5. Import you source files into the repo – My source files are in directory “/root/kc/for-svn/iRunway” ——
[root@rknowsys2 var]# svn import /root/kc/for-svn/iRunway file:///var/subversion/repos/iRunway -m “initial import”
You will see stuff like this……..
Adding /root/kc/for-svn/iRunway/trunk/public/application-help.html
Adding /root/kc/for-svn/iRunway/trunk/public/favicon.ico
………………
…………..
……………………………..
Committed revision 1.

6. Now ensure that /var/subversion is owned by apache – Since I ran the ‘svn create’ and ‘svn import’ as root, I am not sure who owns the repo – The below command is to remove these doubts:
[root@rknowsys2 for-svn]# chown -R apache:apache /var/subversion

7. Now lets configure apache to work with subversion
refer this link: http://svnbook.red-bean.com/nightly/en/svn.serverconfig.httpd.html
Edit the conf file and add the content at the end of the file:
[root@rknowsys2 junk]# vi /etc/httpd/conf/httpd.conf
# kc start configuring apache for subversion 07-aug-07
# Instructions from:
# http://svnbook.red-bean.com/nightly/en/svn.serverconfig.httpd.html
# The above page is also saved to /root/admin-functions/subversion-stuff
# already loaded – kc LoadModule dav_svn_module modules/mod_dav_svn.so

DAV svn
SVNPath /var/subversion/repos/
#ServerName svn-rknowsys.no-ip.info
#ServerName 192.168.0.13 server name given in orig location above!!!!

# how to authenticate a user
AuthType Basic
AuthName “Subversion repository”
AuthUserFile /etc/svn-auth-file

# only authenticated users may access the repository
Require valid-user

CustomLog logs/svn_logfile “%t %u %{SVN-ACTION}e” env=SVN-ACTION
# kc end subversion stuff 07-aug-07

8. Now create subversion users:
[root@rknowsys2 junk] htpasswd -cm /etc/svn-auth-file kcr
New password: *****
Re-type new password: *****
Adding password for user kcr

9. Restart the httpd server
[root@rknowsys2 for-svn]# service httpd restart
Stopping httpd: [ OK ]
Starting httpd: [ OK ]

10. Start using the repo
[root@rknowsys2 junk]# svn list http://192.168.0.13/repos/iRunway
Authentication realm: Subversion repository
Password for ‘root’:
Authentication realm: Subversion repository
Username: kcr
Password for ‘kcr’:
branches/
tags/
trunk/
[root@rknowsys2 junk]#

11. And now start creating subversion users using the htpasswd command shown above. – You are ready to roll it out to users.

12. Making multiple subversion repositories:
Let us do this in directory:/var/subversion/repos1
[root@rknowsys2 ~]# sudo -u apache mkdir -p /var/subversion/repos1
[root@rknowsys2 ~]# svnadmin create /var/subversion/repos1/ideaexchage
[root@rknowsys2 ~]# svnadmin create /var/subversion/repos1/tourism
[root@rknowsys2 ~]# svn import /root/kc/for-svn/ideaXchange/ file:///var/subversion/repos1/ideaexchage/ -m “Initial import”
Adding ……..
………………………………………………….
Committed revision 1.
[root@rknowsys2 ~]# svn import /root/kc/for-svn/tourism/ file:///var/subversion/repos1/tourism/ -m “Initial import”
Committed revision 1.

13. Now need to modify apache conf file:
Put this in the apache dir:
# kc start configuring apache for multiple repos in subversion 22-aug-07
# Instructions from:
# http://svn.haxx.se/users/archive-2004-09/1190.shtml
# http://cheminfo.informatics.indiana.edu/~rguha/misc/svnapache.html
# The above page is also saved to /root/admin-functions/subversion-stuff
# already loaded – kc LoadModule dav_svn_module modules/mod_dav_svn.so

DAV svn
SVNParentPath /var/subversion/repos1/

# how to authenticate a user
AuthType Basic
AuthName “Subversion repository”
AuthUserFile /etc/svn-auth-file

# only authenticated users may access the repository
Require valid-user

# kc end subversion stuff 22-aug-07

14. Restart the apache server
[root@rknowsys2 ~]# service httpd restart
Stopping httpd: [ OK ]
Starting httpd: [ OK ]

15. Verify that the new repos are accessible
[root@rknowsys2 ~]# svn list http://192.168.0.12/repos1/tourism
Authentication realm: Subversion repository
Password for ‘root’:
Authentication realm: Subversion repository
Username: kcr
Password for ‘kcr’:
branches/
tags/
trunk/
[root@rknowsys2 ~]#

WORKING FINE………..
The problem was I typed ‘repo1’ instead of ‘repos1’

Posted in Linux | Leave a Comment »

virtual box in ununtu

Posted by sasikumarp on August 22, 2008

Howto Install VirtualBox 1.6 in Ubuntu 8.04(Hardy Heron) including USB Support

http://ubuntuforums.org/showthread.php?p=2202027

http://ubuntuforums.org/archive/index.php/t-393582.html

Posted in Uncategorized | Leave a Comment »

pear upgrad new version

Posted by sasikumarp on July 22, 2008

   pear upgrade –force http://pear.php.net/get/Archive_Tar http://pear.php.net/get/XML_Parser http://pear.php.net/get/Console_Getopt-1.2.2
   pear upgrade –force http://pear.php.net/get/PEAR-1.3.3 (_IF_ your existing version is older than 1.3.3)
   pear upgrade –force http://pear.php.net/get/PEAR-1.4.3.tar
   pear upgrade PEAR

Posted in Windows | Leave a Comment »

php-pear upgrade

Posted by sasikumarp on June 11, 2008

Procedure

  1. Create a temp directory:
    E.g.: C:\temp
  2. Download PEAR 1.3.3 and unzip the content into the temp directory.
  3. Open a dos window and go to the temp directory:
    cd C:\temp
  4. Install PEAR 1.3.3, type:

    C:\temp>pear upgrade PEAR-1.3.3

    You will see the following:

    downloading PEAR-1.3.3.tgz …
    Starting to download PEAR-1.3.3.tgz (103,320 bytes)
    ……………………done: 103,320 bytes
    upgrade ok: PEAR 1.3.3

  5. Install Archive_Tar-1.3.1, type:

    C:\temp>pear upgrade –force PEAR-1.3.6 Archive_Tar-1.3.1 Console_Getopt-1.2

    You will see the following:

    downloading PEAR-1.3.6.tgz …
    Starting to download PEAR-1.3.6.tgz (106,880 bytes)
    …………………….done: 106,880 bytes
    downloading Archive_Tar-1.3.1.tgz …
    Starting to download Archive_Tar-1.3.1.tgz (15,102 bytes)
    …done: 15,102 bytes
    downloading Console_Getopt-1.2.tgz …
    Starting to download Console_Getopt-1.2.tgz (3,370 bytes)
    …done: 3,370 bytes
    upgrade ok: Console_Getopt 1.2
    upgrade ok: Archive_Tar 1.3.1
    requires package ‘XML_RPC’ >= 1.4.0
    PEAR: Dependencies failed

    //<![CDATA[
    document.write(display_ad_inside_content());
    //]]>
    <!–
    google_ad_client = “pub-0337924350061493”;
    google_ad_slot = “6890238920”;
    google_ad_width = 300;
    google_ad_height = 250;
    //–>
  6. Install PEAR-1.4.3, type:

    C:\temp>pear upgrade PEAR-1.4.3

    You will see the following:

    downloading PEAR-1.4.3.tgz …
    Starting to download PEAR-1.4.3.tgz (276,859 bytes)
    …………………………………………………done: 276,859 bytes
    Optional dependencies:
    package ‘XML_RPC’ version >= 1.4.0 is recommended to utilize some features.
    Installed version is 1.1.0
    package ‘PEAR_Frontend_Web’ version >= 0.5.0 is recommended to utilize some
    features.
    package ‘PEAR_Frontend_Gtk’ version >= 0.4.0 is recommended to utilize some
    features.
    upgrade ok: PEAR 1.4.3
    WARNING: channel “pear.php.net” has updated its protocols, use “channel-update
    pear.php.net” to update
    Did not download optional dependencies: pear/XML_RPC, use –alldeps to download
    automatically
    Skipping package “pear/PEAR”, already installed as version 1.4.3
    downloading Console_Getopt-1.2.2.tgz …
    Starting to download Console_Getopt-1.2.2.tgz (4,252 bytes)
    …..done: 4,252 bytes
    upgrade ok: channel://pear.php.net/Console_Getopt-1.2.2

  7. Install PEAR-1.4.11, type:

    C:\temp>pear upgrade –force PEAR-1.4.11

    You will see the following:

    WARNING: channel “pear.php.net” has updated its protocols, use “channel-update
    pear.php.net” to update
    Did not download optional dependencies: pear/XML_RPC, use –alldeps to download
    automatically
    warning: pear/PEAR requires package “pear/XML_RPC” (version >= 1.4.0), installed
    version is 1.1.0
    downloading PEAR-1.4.11.tgz …
    Starting to download PEAR-1.4.11.tgz (283,272 bytes)
    …………………………done: 283,272 bytes
    upgrade ok: channel://pear.php.net/PEAR-1.4.11
    PEAR: Optional feature webinstaller available (PEAR’s web-based installer)
    PEAR: Optional feature gtkinstaller available (PEAR’s PHP-GTK-based installer)
    PEAR: Optional feature gtk2installer available (PEAR’s PHP-GTK2-based installer)

    To install use “pear install PEAR#featurename”p” — upgrade –force PEAR-1.4.11

  8. Upgrade PEAR to the latest version, type:

    C:\temp>pear upgrade PEAR

    You will see the following:

    Did not download optional dependencies: pear/XML_RPC, use –alldeps to download
    automatically
    pear/PEAR requires package “pear/XML_RPC” (version >= 1.4.0), installed version
    is 1.1.0
    downloading Archive_Tar-1.3.2.tgz …
    Starting to download Archive_Tar-1.3.2.tgz (17,150 bytes)
    ……done: 17,150 bytes
    downloading Structures_Graph-1.0.2.tgz …
    Starting to download Structures_Graph-1.0.2.tgz (30,947 bytes)
    …done: 30,947 bytes
    upgrade ok: channel://pear.php.net/Structures_Graph-1.0.2
    upgrade ok: channel://pear.php.net/Archive_Tar-1.3.2

  9. Now you can upgrade all your installed packages, type:

    C:\temp>pear upgrade-all

    You will see the following:

    Will upgrade db
    Will upgrade mail
    Will upgrade net_smtp
    Will upgrade net_socket
    Will upgrade pear
    Will upgrade xml_parser
    Will upgrade xml_rpc
    Did not download optional dependencies: pear/Auth_SASL, use –alldeps to
    download automatically
    pear/Net_SMTP can optionally use package “pear/Auth_SASL”
    downloading DB-1.7.11.tgz …
    Starting to download DB-1.7.11.tgz (132,064 bytes)
    ………………………..done: 132,064 bytes
    downloading Mail-1.1.14.tgz …
    Starting to download Mail-1.1.14.tgz (17,537 bytes)
    …done: 17,537 bytes
    downloading Net_SMTP-1.2.10.tgz …
    Starting to download Net_SMTP-1.2.10.tgz (10,923 bytes)
    …done: 10,923 bytes
    downloading Net_Socket-1.0.7.tgz …
    Starting to download Net_Socket-1.0.7.tgz (5,419 bytes)
    …done: 5,419 bytes
    downloading PEAR-1.5.1.tgz …
    Starting to download PEAR-1.5.1.tgz (290,252 bytes)
    …done: 290,252 bytes
    downloading XML_Parser-1.2.8.tgz …
    Starting to download XML_Parser-1.2.8.tgz (13,476 bytes)
    …done: 13,476 bytes
    downloading XML_RPC-1.5.1.tgz …
    Starting to download XML_RPC-1.5.1.tgz (32,215 bytes)
    …done: 32,215 bytes
    upgrade-all ok: channel://pear.php.net/XML_Parser-1.2.8
    upgrade-all ok: channel://pear.php.net/XML_RPC-1.5.1
    upgrade-all ok: channel://pear.php.net/PEAR-1.5.1
    PEAR: Optional feature webinstaller available (PEAR’s web-based installer)
    PEAR: Optional feature gtkinstaller available (PEAR’s PHP-GTK-based installer)
    PEAR: Optional feature gtk2installer available (PEAR’s PHP-GTK2-based installer)

    upgrade-all ok: channel://pear.php.net/Net_Socket-1.0.7
    upgrade-all ok: channel://pear.php.net/Mail-1.1.14
    upgrade-all ok: channel://pear.php.net/Net_SMTP-1.2.10
    upgrade-all ok: channel://pear.php.net/DB-1.7.11
    To install use “pear install pear/PEAR#featurename”

  10. Update the channels, type:

    C:\temp>pear update-channels

    You will see the following:

    Updating channel “pear.php.net”
    Updating channel “pecl.php.net”
    update-channels complete

  11. Now you can install any package, for example Log, type:

    C:\temp>pear install Log

    You will see the following:

    WARNING: “pear/DB” is deprecated in favor of “pear/M”
    Did not download optional dependencies: pear/MDB2, use –alldeps to download automatically
    pear/Log can optionally use package “pear/MDB2” (version >= 2.0.0RC1)
    pear/Log can optionally use PHP extension “sqlite”
    downloading Log-1.9.10.tgz …
    Starting to download Log-1.9.10.tgz (37,063 bytes)
    ……….done: 37,063 bytes
    install ok: channel://pear.php.net/Log-1.9.10

  12. Show all installed packages, type:

    C:\temp>pear list

    You will see the following:


    INSTALLED PACKAGES, CHANNEL PEAR.PHP.NET:
    =========================================
    PACKAGE          VERSION STATE
    Archive_Tar      1.3.2   stable
    Console_Getopt   1.2.2   stable
    DB               1.7.11  stable
    Log              1.9.10  stable
    Mail             1.1.14  stable
    Net_SMTP         1.2.10  stable
    Net_Socket       1.0.7   stable
    PEAR             1.5.1   stable
    PHPUnit          0.6.2   stable
    Structures_Graph 1.0.2   stable
    XML_Parser       1.2.8   stable
    XML_RPC          1.5.1   stable
      

Posted in Uncategorized | Leave a Comment »

How to Manually Remove Viruses From Your System

Posted by sasikumarp on March 19, 2008

Note: This solution will work only against those Viruses which does not infect Windows own Exe files e.g like explorer.exe

Virus Symptoms

You may have seen some unexpected things that should not happen. Some of the symptoms of viruses are:

Disables Task Manager

Disables Registry Editor

Disables Command Prompt

Sometime you have no application open but CPU usage goes over 50%

My Computer Drives not opening by Double Click

Automatic Shutdown

Computer Slows down

Hidden Files will not be showing

Folder Options will be disappear 

Manual Removal

If you have tried all the solutions listed on our site and still could not disinfect your system then try to manually remove the virus using the instructions below:

In order to compelete the instructions below. You need to have Process Explorer and Autoruns. Download them separately

http://download.sysinternals.com/Files/ProcessExplorer.zip

http://download.sysinternals.com/Files/Autoruns.zip

Unpack these and copy exe files to Windows Directory

Close and exit all programs (even from tray) except Internet Explorer or your internet browser
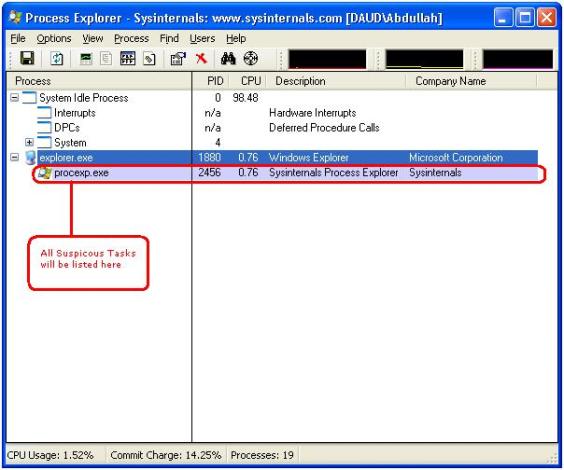
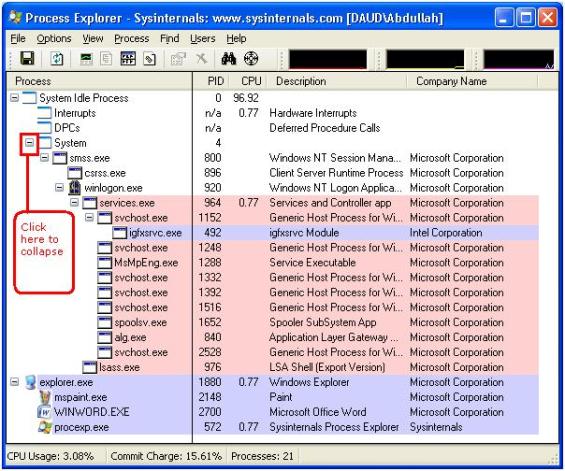
Run process explorer by typing procexp in the start menu Run and do as illustrated.
1111.jpg
After collapsing
1212.jpg

procexp.exe is Process Explorer’s own process

winword.exe is MS WORD

mspaint.exe is Paint

IEXPLORE.exe is Internet Explorer

Wmplayer.exe is Windows Media Player

If you do see any suspicious process

then right click on it and then properties. In the path: field copy the path and Open Run Dialogue and paste the path there
Now terminate the suspicious task in process explorer
If the same process starts again then suspend the process by right clicking on it and click suspend on the menu. Remove the name of the application from path now listing only folder.

e.g If you have copied C:\WINDOWS\system32\mspaint.exe then remove mspaint.exe and you will see C:\WINDOWS\system32\ this in the Run Dialogue.
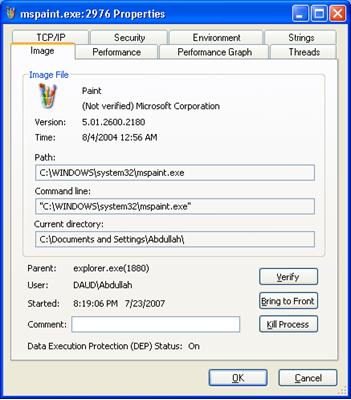
4444.jpg

Delete Hidden Files

Press Enter to open Explorer and locate the file name whose name you have just removed.After locating the file delete the file.If you can not find the file it must be hidden.

If Show Hidden Files and Folders Option not working Use WinRAR

To remove hidden files Download WinRAR which will show you all hidden files
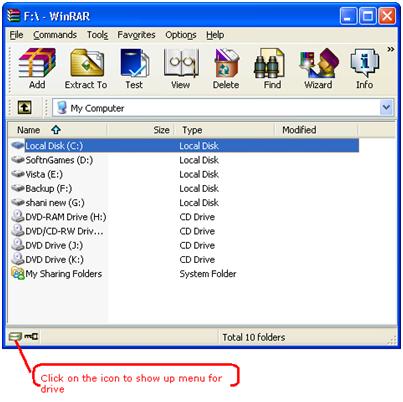
55555.jpg

See the figure and locate that file and delete that file. If still unable to delete file then see our post about deleting the file.

Now look at the root of every drive to find hidden files.

Delete .exe and autorun.inf like files if you find any. But do not delete these files as these are system files

autoexec.bat, boot.ini, bootmgr,config.sys, io.sys, msdos.sys, ntdetect.com, pagefile.sys,ntldr, hiberfil.sys

Now you have successfully terminated virus process the next thing is to remove those virus files which start upon system start.

Open Autoruns by typing autoruns in the Run Dialogue. Wait while refreshing completes.

In the Options –> Hide Microsoft Entries. And click Refresh button on the interface OR Close the program and start again
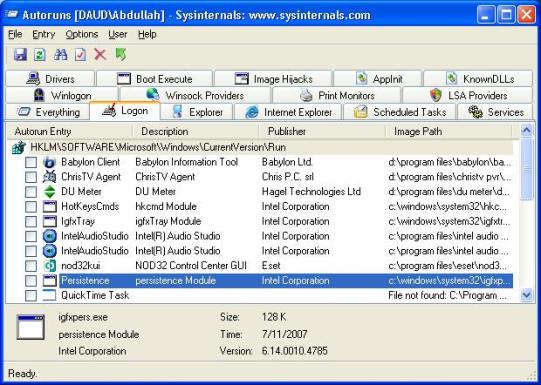
autoruns.jpg

After scanning completes select Logon tab and uncheck all the entries be sure do not unselect any Microsoft Entry.Restart system for the changes to take effect.

Now use Ravmon Virus Killer to restore some settings

Now scanning your system for an Anti-Virus will be the last suggestion

Troubleshooting

Incase of any problem. you did a wrong move. Open Autoruns, in the Options –> Unselect Hide Microsoft Entries. And click Refresh button on the interface OR and select all entries .Close the program and start your system again.

Enable Run Command if it is missing from Start Menu December 8, 2007

Posted by raghupathy in Windows.
add a comment

Some User have complained about the Run Command missing from Start Menu due to some virus effects. Also users when press ( Windows Key + R ) to use Run command an error message appears

This operation has been cancelled due to restrictions in effect on this computer. Please contact your system administrator.

screenshot003.jpg

Run not displaying in Start Menu

So I have finally came up with the solution for it. I have made up two solutions, Manual and Automatic. First try Manual and if it did not work then try Automatic.

Manual Solution

Open My Computer –> C drive –> Windows –> System32 –> Locate gpedit.msc file and run it. See the figure below

screenshot004.jpg

While you have opened Group Policy see in the left pane and in the User Configuration Expand Administrative Templates and select Start Menu  and Taskbar now in the right pane locate Remove Run Menu from Start Menu and double click it. See the figures

screenshot005.jpg

screenshot008.jpg

Select Disabled in the properties dialogue and press apply then OK

Now close all open Windows you will see the Run has been restored in Start Menu. See the figure now

94455.jpg

Automatic Solution

Download Ravmon Virus Removal Tool and then use Restore Default Windows Settings to Restore.

After this either Restart or kill explorer.exe or run it again

Posted in Windows | 1 Comment »

new folder.exe virus

Posted by sasikumarp on March 14, 2008

http://www.whoismadhur.com/2008/01/26/how-to-remove-virus-from-usb-drives/

http://tec-updates.blogspot.com/2007/10/new-folderexe-virus-removal-tool.html

http://technize.com/2007/07/18/new-folderexe-sohanad-virus-removal-tool/

New Folder.exe Virus Removal Tool

Posted in Windows | 4 Comments »

wvdial configuration in Linux

Posted by sasikumarp on March 13, 2008

[Dialer Defaults]
Modem = /dev/ttyUSB0
Baud = 57600
Init1 = ATZ
Init2 = ATQ0 V1 E1 S0=0 &C1 &D2
Phone = #777
Username =internet
Password =internet
Ask Password = 0
Stupid Mode = 1
Idle Seconds = 500
ISDN = 0
Auto DNS = 1

Posted in Linux | Leave a Comment »

Simple steps to configure CVS

Posted by sasikumarp on March 13, 2008

Linux setup a Concurrent Versioning System (CVS) howto

Q. I am planning to use Concurrent Versioning System. I am using both Red Hat and Fedora Linux. How do I setup a CVS server?

A. Concurrent Versioning System (CVS) a widely used version control system for software development or data archiving solutions.

From the wiki page, “CVS keeps track of all work and all changes in a set of files, typically the implementation of a software project, and allows several (potentially widely separated) developers to collaborate”.

CVS Configuration – Install CVS

Use rpm or up2date or yum command to install cvs:# rpm -ivh cvs*OR# up2date cvsOR# yum install cvsCreate a CVS user# useradd cvs
# passwd cvs
Above command will create a user cvs and group cvs with /home/cvs home directory.

Configure CVS

Open /etc/profile and append following line:# vi /etc/profileAppend following line:export CVSROOT=/home/cvsSave the file and exit to shell promot.

Make sure your /etc/xinetd.d/cvs looks as follows:# less /etc/xinetd.d/cvsOutput:

service cvspserver
{
       disable            = no
       socket_type    = stream
       wait                = no
       user                = cvs
       group              = cvs
       log_type          = FILE /var/log/cvspserver
       protocol          = tcp
       env                 = '$HOME=/home/cvsroot'
       bind                = 192.168.1.100
       log_on_failure  += USERID
       port                = 2401
       server             = /usr/bin/cvs
       server_args     = -f --allow-root=/home/cvsroot pserver
}

Note: Replace 192.168.1.100 with your actual server IP address.

Restart xinetd:# service xinetd restartAdd users to this group (see this howto for more info)# adduser username -g cvs
# passwd username

Client configuration
Finally user can connect to this CVS server using following syntax:
$ export CVSROOT=:pserver:vivek@192.168.1.100:/home/cvs
$ cvs loginWhere,

  • vivek – username
  • 192.168.1.100 – CVS server IP

See also:

Posted in Linux, Uncategorized | Leave a Comment »